Purl Creator Manual
A practical guide to building with Purl. For complete syntax, see the Syntax Reference.
Part 1: Foundations
1. Overview
Purl Studio is a visual builder for interactive HTML5 things — games, stories, simulations, presentations. You draw objects on a canvas, give them properties, behaviors, instructions and they come to life. A shape with "movable" and "keyboard" instantly becomes keyboard controllable. Mark another shape as "blocking" and it's a wall which a movable will hit. Add "gravity" to the setting and you have yourself a platformer. Throw in some emitters and it will start to rain or snow. Start adding simple logic based scripts to objects and quickly things will get out of hand (in a good way).
The building blocks are small and universal. "Movable" makes something move. "Blocking" makes it solid. "Sensor" makes it detect overlap. "Follow" makes it chase a target. "Draggable" lets the player grab it. These behaviors combine: a shape that's movable + follows the player + has a sensor is a robot. A draggable shape on a grid with occupancy checks is a puzzle piece. A few properties, mixed differently, cover platformers, top-down RPGs, physics sandboxes, tile puzzles, visual novels, and interactive presentations.
When you need logic — "if this then that" — you add short scripts directly on objects. Scripts respond to different events such as clicking, pressing specific keys, starting the game, receiving messages, passage of time and a lot more. A coin pickup is three lines: detect overlap with the player, add to the score, destroy self. Each object carries its own script, handles its own behavior, works independently or teaming up with other objects.
You design in Build Mode, press Space to test in Play Mode, tweak, repeat. When you're done, export as a single HTML file — no server, no dependencies, runs in any browser or the Purl Player mobile app. You can publish your creation anywhere, embed it as part of a webpage and share it with friends.
For hands-on walkthroughs, jump to the Examples. For complete scripting syntax, see the Syntax Reference.
2. Objects
Everything you build in Purl is made of objects. You place them inside project cells on the canvas, give them properties, connect them with scripts. Understanding what kinds of objects exist and how they relate to each other is the foundation.
Primes — the atomic building blocks. Some are visible to the player, others are invisible infrastructure that supports the scene:
Visible — what the player sees and interacts with:
| Type | What it is |
|---|---|
| Shape | Rectangles, circles, polygons, custom paths — the visual workhorse |
| Text | Single-line text — labels, scores, titles. Auto-sizes to fit |
| Textbox | Multi-line text — paragraphs, dialog, descriptions. Wraps within a bounding box. Either can be made editable at runtime |
| Line | Connectors, arrows, paths for movement |
| Grid | Tile-based boards for puzzles, strategy, card games |
| Emitter | Particle effects — fire, smoke, sparks, rain |
Infrastructure — invisible in play, but essential behind the scenes:
| Type | What it is |
|---|---|
| Audio | Sound effects, music, ambient loops |
| Peg | Physics joints — hinges, pendulums, ragdolls |
| Spring | Elastic connections between pegs |
| Viewport | Camera control and parallax |
| Marker | Invisible x/y reference points. Used for spawn positions, animation targets, name-lookup positions, etc. |
Components — most things you build are components. Select a few primes, group them, and they become a single unit that moves, scales, and rotates together. A button is a shape + text. A character is a body + eyes + hat. A card is a front face + back face. A vehicle is a chassis + wheels + turret. You can give a component its own script, its own states, its own physics — and the children come along for the ride. Components nest: a character component can contain an arm component that contains a hand component. Double-click a component to edit its children, Escape to go back up.
Cells and Coordinates
A project is made of cells — screens, scenes, rooms. The Map View shows all cells laid out spatially. Double-click one to enter Cell View and start building. Each cell has its own objects, background, and physics settings (gravity, wind, drag). Players move between cells with goto "CellName". Cells can be larger than the viewport — a 3×2 cell creates a scrolling level that the player can drag to pan around, or that scrolls automatically when following a camera subject.
All positions use cell units where 1.0 = one cell height. (0, 0) is the top-left corner, (0.5, 0.5) is the center of a 1×1 cell, and a width of 0.2 means 20% of cell height. For a 3×2 cell, x goes from 0 to 3, y from 0 to 2.
Objects placed directly on the canvas have absolute positions — x: 0.3 means 0.3 on the cell, always. Objects inside a component have relative positions — they're placed relative to the component's center. If the component moves, all children move with it. This distinction matters throughout Purl: when you set x/y in a script, drag an object in play mode, or work with states, a canvas object goes to a fixed spot on screen while a component child stays relative to its parent.
Referencing Objects
Scripts need to talk about objects — move this one, check that one's energy, hide a group. Purl gives you several ways to reference objects:
- By name — every object has a name:
set Door.opacity 0.5 self— the object the script is on:set self.energy 100. This is the most important reference. Always useselfinstead of hardcoding your object's name — it means the script works on any copy, clone, or spawned instance.other— the other object in a collision or overlap:if other is #robot:parent,children,siblings— navigate the component treeroot— the outermost ancestor:set other.root.hit true. Walks all the way to the top of the component chain. If the object isn't nested at all,rootis the object itself, so writes are always safe. Useful when a child (a collision-shape sensor, a hitbox, a deeply-nested label) needs to talk to the whole component instead of one level up.#tag— target all objects with a tag at once:hide #robots
Tags let you group objects across the cell regardless of hierarchy. Add tags at the bottom of the Structure panel or at runtime via addTag/removeTag. An object can have multiple tags. Use them to address whole categories: destroy #coins, set #robots.speed 0, count #alive.
Object Variables
Any property name that isn't built-in becomes a per-object variable — self.energy, self.score, self.charges. Each object instance gets its own independent value. This is how objects carry their own data: a robot tracks its energy, a timer tracks its countdown, a tile tracks whether it's been visited.
Custom variables can also hold maps and arrays. set self.cupData.waterMass 0 writes into a per-object dict; sibling fields stay intact. Read with self.cupData.waterMass.
Object Properties
Every object has properties that control how it looks and behaves. Some are visual — position, size, color, opacity, rotation. Some are behavioral — movable, blocking, sensor, draggable. Some are structural — tags, layer, z-index. You set them in the Properties panel when an object is selected, or change them at runtime with scripts (set self.opacity 0.5).
Properties fall into groups: spatial (position, size, rotation, flip) define where the object is, visual (color, opacity, fills, stroke, shadow, glow) define how it looks, physical (mass, friction, restitution, gravity scale, drag scale) control how it interacts with the physics engine, and behavioral (movable, blocking, sensor, draggable, etc.) define what it does. A few properties are derived — read-only values computed from the others, like area (the geometric area of a shape, in cell units²; works for rectangles, ellipses, polygons, and curved paths). The Syntax Reference lists every property with its type and allowed values.
Terminal
For bulk property editing across many objects at once, use the Terminal (toggle with Ctrl+T). It works in two phases:
- GET — type a query to select objects. Matching objects highlight on canvas.
- SET — type a property change. Applied to all selected objects in one undo step.
| Selector | Matches | Example |
|---|---|---|
* |
All objects | * |
type:X |
By type | type:rectangle |
name:X |
By name (* wildcard) |
name:gem* |
tag:X |
By tag | tag:collectible |
in:X |
Children of component | in:gemstone |
!selector |
Negate | !type:text |
| Operator | Meaning | Example |
|---|---|---|
= |
Set value | opacity = 0.5 |
+= |
Add | x += 0.05 |
-= |
Subtract | rotation -= 15 |
*= |
Multiply | width *= 2 |
|= |
Color transform | color.color |= brighten(20) |
Color transforms: brighten(N), darken(N), hue(N), saturate(N), desaturate(N), invert().
Useful Tools
A few tools that aren't immediately obvious but save a lot of time:
- Tiling — copy objects, then right-click canvas → Tile. Repeats them to fill the cell in a direction (right, down, or flood). Great for floors, walls, backgrounds.
- Generators — right-click canvas → Generator. Creates procedural terrain, skylines, vegetation, clouds, or cave formations as editable vector paths.
- Trace — right-click an image-filled shape → Trace. Converts it to an editable vector path (polygon or bezier curves).
3. States
Every object has properties — position, color, size, opacity, rotation. You can change these in the editor or with scripts like set Box.opacity 0.5. But what if you could capture a whole combination of properties, give it a name, and switch to it with one command? That's what states are. You design different looks for an object in the editor, save each one as a named state, and then your scripts just say set Box.state "HOVER" — one line changes everything at once. States can switch instantly or animate smoothly over time.
What States Do to Properties
When you apply a state, each property it contains is handled in one of three ways:
| Spatial (position, size, rotation, flip) | Non-spatial (color, opacity, text, stroke) | |
|---|---|---|
| Changed | Shifts by an offset (e.g., move 0.1 right) | Sets to an exact value (e.g., turn blue) |
| Promoted | Undoes — returns to starting position | Undoes — resets to original value |
| Not tracked | Doesn't touch it | Doesn't touch it |
The first state you save also defines the starting position and original values — what "undo" means for all future states. For objects on the canvas, position states put the object at a fixed screen location. For objects inside a component, position states are relative to the parent — the object follows the parent around.
These concepts will make more sense as we walk through a concrete example.
Example Part 1: A Shape on the Canvas
Let's start simple — a single rounded rectangle that toggles between two looks.
Step 1 — Design the default look. Create a rounded rectangle. Set it to gray, positioned at x: 0.3.
Step 2 — Save the first state. In the States section of the properties panel, click Capture (or press Shift+S). A capture indicator appears — you're now in capture mode. You haven't changed anything yet, so type "OFF" and press Enter. This saves a state with no data, but it locks the current appearance as the starting point all states are measured against.
Capture takes a snapshot when you click the button — only changes made after that snapshot are recorded. Always click Capture first, then make changes. Press x to cancel without saving. While in capture mode, you can also shift-click another object to copy its appearance onto the selected one.
Step 3 — Save the second state. Click Capture again. Move the rectangle to x: 0.5 and change its color to green. Type "ON" and press Enter.
The ON state now contains two things: a position offset of +0.2 (it shifted right) and the color green. Notice the difference — position is stored as a shift (+0.2 from starting position), but color is stored as an exact value (green). Since this shape is on the canvas, the starting position is an absolute screen coordinate — so ON always puts the shape at x: 0.5, a fixed spot on screen.
Step 4 — Try it. Add a script:
onClick:
  if self.state == "OFF":
    set self.state "ON"
  else:
    set self.state "OFF"
Click in play mode — it turns green and moves right. Click again... nothing happens. The OFF state is empty, so switching to it doesn't touch anything.
Step 5 — To promote or not? The OFF state is empty — it doesn't change anything. Should you promote properties into it? It depends on what you're building. Compare two objects side by side:
Toggle button — should snap between two fixed positions. Quiz tile — can be colored RED or GREEN, and independently moved UP or DOWN.
Both start the same way: state A is empty, state B changes position and color.
| Step | Toggle button | Quiz tile |
|---|---|---|
| Save state A (no changes) | "OFF" — empty | "RED" — only color, no position |
| Save state B (move + recolor) | "ON" — position +0.2, color green | "UP" — only position, no color |
| Apply B | Moves right, turns green | Moves up |
| Apply A | Nothing — stays right, stays green | Turns red, stays up |
| Problem? | Yes — can't toggle back | No — that's exactly right. Color and position are independent layers |
| Fix | Promote x and color into OFF | Don't promote — if UP promoted color, switching to UP would reset the color. The two layers would interfere |
| After fix, apply B then A | Moves right → moves back. Green → gray. Toggles. | Moves up, stays red. Color and position work independently. |
Rule of thumb: Promote when you want a state to undo what other states did (toggle button). Don't promote when you want states to be independent layers that don't interfere with each other (quiz tile).
You can also click the pencil icon on any tracked value to edit it directly, or x to remove a property you don't want the state to touch. Editing a promoted value changes what the state does — a promoted x of 0 means "go back to starting position," but if you change it to +0.1, the state now moves the object to a new position instead of resetting it. This is useful for fine-tuning: if you captured a state by dragging but the position is slightly off, click the pencil and type the exact offset instead of recapturing. Or use it to create new positions without capturing at all — promote x, then edit the value to wherever you want.
Step 6 — Animate. Change the script to transition smoothly:
onClick:
  if self.state == "OFF":
    set self.state "ON" over 300 ease-in-out
  else:
    set self.state "OFF" over 300 ease-in-out
Red values: If you move the object while a state is active but don't update the state, the pill turns red. Right-click it to see which values don't match (shown as stored → current). Right-click → Update State to re-save, or click the pill to reapply.
Example Part 2: Making It a Component
A real button has a background shape and a label. Select both and group them into a component called "ToggleButton."
Now the shape is inside a component. This changes how position works in states: position is now relative to the parent component, not absolute on screen. If you move the ToggleButton component around, the child shape follows — and its ON state still puts it 0.2 to the right of wherever the parent places it, not at a fixed screen coordinate.
Adding states to the label. Select the label inside the component. Create states with the same names — "OFF" and "ON." For OFF, leave it as-is (or promote the text content). For ON, change the text to "Active" and the text color to white.
Now one command updates everything:
set ToggleButton.state "ON"
- ToggleButton's background has "ON" → shifts right, turns green
- Label (child) also has "ON" → changes text and color
- Any child without an "ON" state is unaffected
The connection is purely by name. One set on the parent triggers matching states on all children.
Layering States
Say you want a "PULSE" state that makes the button bigger, independent of ON/OFF. Capture a new state that only changes size.
set ToggleButton.state "ON"      // Shifts right, turns green
set ToggleButton.state "PULSE"   // Makes it bigger — stays green, stays right
States only affect properties they track. ON doesn't touch size. PULSE doesn't touch color or position. They layer independently.
Spatial Modifiers
Sometimes a state contains position changes you don't want to apply. Filter with modifiers:
set Player.state "CROUCH" none           // Skip all spatial — only color/opacity
set Player.state "SHIFTED" position      // Only position change
set Player.state "FLIP" rotate           // Only rotation/flip
set Player.state "BIG" scale             // Only size change
set Player.state "X" position rotate     // Combine modifiers
Building on Other States
Capture while a state is already active, and the new state records only what changed from that point. If ON is active and you change opacity, the new state builds on ON as its origin.
Cycling Through States
set self.state next    // Advance to next state, wraps around
set self.state prev    // Go to previous state
Other Editing Features
- Preview: Click a state pill to preview it on the canvas. Click again to revert
- Update: Right-click → Update State to re-save from current appearance (only updates existing tracked properties, doesn't add new ones)
- Multi-select: Select multiple objects, transform them, and click Capture to save the same state on all at once
- Delete all states: Clears the starting point — next state you save starts fresh
4. Animation
Animation in Purl uses state groups — ordered sequences of states that play automatically.
Creating an Animation
- Create multiple states on an object (e.g., "WALK_1", "WALK_2", "WALK_3")
- In the Groups palette (below states), click + to create a group
- Drag states into the group in order
- Set the mode: frame (snap between states) or tween (smooth interpolation)
Playing Animations
animate self "Walk" loop                  // Cycle forever
animate self "Walk" once                  // Play once and stop
animate self "Walk" pingpong              // Forward then backward
animate self "Walk" loop fps 12           // 12 frames per second
animate self "Walk" once duration 500     // Complete in 500ms
animate self "Walk" once ease-in-out      // With easing
animate self "Walk" loop resume           // Don't restart if running
animate self "Walk" once exclusive        // Stop other animations first
animate self "Spin" loop cw              // Force clockwise rotation
stop animate self                         // Stop all
stop animate self "Walk"                  // Stop specific
Resume
The resume keyword: if already animating, do nothing. If starting fresh, tween from current appearance. Essential for movement animations:
onMove:
  animate self "Walk" loop resume

onStop:
  stop animate self
Without resume, every onMove frame would restart from the beginning.
Concurrent Animations
Multiple groups run simultaneously. Each controls its own properties independently:
animate self "Walk" loop
animate self "Breathe" loop fps 2
Use exclusive to stop all others before starting.
Property Tweens
Animate a single property without states:
set self.opacity 0 over 500
set self.fillColor "#ff0000" over 1000 ease-in-out
set self.x 0.8 over 300 ease-out
Tweens run in the background — script continues immediately.
State Tweens
Smoothly transition to a named state:
set self.state "hover" over 300
set self.state "expanded" over 500 ease-in-out
set self.state "RED" position over 300 ease-out     // Spatial modifier before "over"
Animation + Physics
Animated objects participate in physics — an animated blocker stops incoming objects, an animated sensor triggers overlaps. The collision shape tracks the animated position.
Sprite Sheets
Upload a sprite sheet image as a fill layer, then set the columns and rows to slice it into a grid of frames. Each frame is addressed by a 0-based index in row-major order. The current frame is controlled by the spriteFrame property on the image fill layer.
To animate a sprite sheet, use Decompose in the fill panel — it automatically creates one state per frame (named F1-1, F1-2, etc.) and a state group to animate them. You can decompose the entire sheet, a single row, or a single column. For a character with 4 directions × 4 walk frames, decompose by row to get four separate animation groups (one per direction), then trigger them from movement events:
onMove "left":
  animate self "LEFT" exclusive

onMove "right":
  animate self "RIGHT" exclusive

onStop:
  stop animate self
Frame animation uses the frame mode in state groups — states snap instantly instead of tweening. Set fps to control the frame rate. Each frame state only changes spriteFrame on the fill layer; all other properties stay the same.
Component Animation
The children modifier animates each child independently using their own matching states:
animate Keyboard "Press" once children
Without children, the component animates as a whole unit.
Visual Effects
Quick one-shot effects you can apply to any object — no states or groups needed:
shake self 300                    // Tremor for 300ms
shake self 500 10                 // With custom intensity
vibrate self loop                 // Continuous vibration (until stopped)
pulse self 200                    // Scale pulse
squeeze self 400 vertical         // Squash and stretch
bounce self 500                   // Vertical bounce
spin self 1000 ccw                // Full rotation
glow self 300                     // Flash glow effect
stop self                         // Stop all effects
stop self shake                   // Stop specific effect
These are fire-and-forget — the script continues immediately. Combine with game events for impact feedback:
onCollide:
  if other is #hazard:
    shake self 200
    set self.energy self.energy - 10
5. Scripts
Scripts are how you add logic to objects. Every script lives on an object (or the cell itself) and responds to events — things that happen. A click, a collision, a key press, a timer tick, entering a cell. When the event fires, the script's instructions run.
Most of what scripts do is change the same properties you set in the properties panel — position, color, opacity, size, visibility, states, physics settings. The difference is when: the properties panel defines design-time appearance (frame 0 — what the object looks like before anything happens), while scripts change properties at runtime (frame 1+ — what happens when the game is playing). A button starts blue (design-time), turns red when clicked (runtime). A character starts at position 0.5 (design-time), moves to where the player walks (runtime). The property system is the same — scripts just change values over time in response to events.
onClick:
  set self.opacity 0.5
  shake self 300
This says: when someone clicks this object, make it half transparent and shake it. The script is on the object, uses self to refer to itself, and runs whenever the event occurs.
Events
Events are the starting points of all script logic. An object can have multiple events, and they run independently.
| Event | When it fires |
|---|---|
onEnter |
Cell loads — use for initialization |
onExit |
Player leaves the cell |
onClick |
Object: clicked. Cell: background click (released over empty canvas). clicked refers to the object actually under the cursor — handy when a component absorbs clicks on its children |
onKeyDown "Key" |
Key pressed (e.g., "Space", "ArrowUp", "a"). Works on the cell script and on objects; there's no focus — every matching handler in the cell runs on each press. Key names are case-insensitive |
onKeyUp "Key" |
Key released (same scope rules as onKeyDown) |
onHover |
Mouse enters object bounds |
onHoverEnd |
Mouse leaves object bounds |
onCollide |
Hits a blocker — other refers to what was hit |
onOverlap |
Starts overlapping a sensor — other refers to the other object |
onOverlapEnd |
Stops overlapping |
onMove / onMove "dir" |
Movement starts (optionally filtered by direction) |
onStop |
Movement stops |
onArrive |
Reached a moveTo destination |
onTick |
Every frame (~60fps) — deltaTime gives seconds since last frame |
onJump |
Jump triggered |
onLanding |
Lands on a surface |
onBounds / onBounds "dir" |
Object crosses cell boundary (optionally filtered: "left", "right", "top", "bottom") |
onSpawn |
Object was spawned at runtime |
onDestroy |
About to be destroyed |
onDragStart / onDrag / onDragEnd |
Drag lifecycle. Object scope auto-moves if draggable; otherwise just fires events. Cell scope fires when the drag starts on empty canvas — use for marquee selection, slice gestures, swipe controls. dragStartX/Y, dragDuration, and clickX/Y available inside |
onScroll |
Mouse-wheel / trackpad scroll. Fires on the object under the pointer if it has a handler, otherwise on the cell. scrollY is the vertical amount (a mouse notch ≈ ±1, fractional on trackpads; > 0 = down/toward you), scrollX is horizontal; clickX/Y give the pointer position. One scroll = one onScroll (no start/end). See §15 for zoom-to-cursor |
onSubmit |
Enter pressed in editable text |
onBreak |
Peg or spring constraint breaks |
onMessage "MSG" |
Receives a shout message |
onMessageFrom "Source" "MSG" |
Receives a shout from a specific sender |
onClick | onKeyDown "Space" |
Combined — multiple events trigger the same code |
Actions
Inside an event, you write actions — things to do:
set— change a property or variable:set self.energy 100,set score score + 1show/hide— visibility with optional transitions:hide self with fade 300spawn/destroy— create or remove objectsenable/disable— toggle behaviors:enable self movable speed 0.5goto— navigate to another cell:goto "Level2" with fadeshout— broadcast a message:shout "gameOver"wait— pause execution:wait 500ms,wait movement selfdo— call a reusable action block:do fireLauncher,do Robot.patrol,do spawnBird {template: "Crow", x: 0.5}(see Custom Actions and Functions below)
Control Flow
Scripts support conditions, loops, and iteration:
if self.energy <= 0:
  destroy self with fade 300

repeat 5:
  spawn "Coin" {x: random(0, 1), y: random(0, 1)}
  wait 200ms

foreach robot in #robots:
  set robot.speed 0
Custom Actions and Functions
Two ways to package logic you'll reuse — they answer different questions.
actionanswers "do this for me." A sequence of steps. It might take time, play sounds, spawn objects, change properties, send messages. It doesn't give anything back.functionanswers "what's the value of this?" A quick calculation. It can branch withif, but it can't pause or change things in the world. It always returns a value.
Actions — do something
Simplest case, no params:
action ringBell:
  play Bell
  wait 200ms
  play Bell

do ringBell
With params (in braces):
action greet {name}:
  shout "HELLO" {who: name}

do greet {name: "Player1"}
Params can have defaults — leave them out at the call site to use the default:
action spawnBird {template, x, y, drift: 0.1}:
  spawn template {x: x, y: y, drift: drift, scrollFactor: 1}

do spawnBird {template: "Crow", x: 0.5, y: 0.5}              # drift defaults to 0.1
do spawnBird {template: "Crow", x: 0.5, y: 0.5, drift: 0.5}  # override
Functions — compute a value
Simplest case, no params:
function answer():
  return 42

set x answer()    # x is now 42
With params:
function distance(ax, ay, bx, by):
  return sqrt((bx - ax) * (bx - ax) + (by - ay) * (by - ay))

set d distance(HAB.x, HAB.y, Goose.x, Goose.y)
if distance(HAB.x, HAB.y, Goose.x, Goose.y) < 0.2:
  shout "TOO_CLOSE"
You can branch and use set for working values inside a function — just no actions on the world:
function clamp(x, lo, hi):
  if x < lo:
    return lo
  if x > hi:
    return hi
  return x

set health clamp(health + heal, 0, 100)
If you try to put wait, spawn, play, or anything that makes the world do something inside a function body, the editor flags it and points you at action instead.
Define action and function anywhere in the cell — call them from any script. Built-in helpers like random, floor, cos, sqrt take precedence if you happen to reuse one of their names.
If multiple objects define an action by the same name, do <name> from a script resolves to the caller's own object first, then any other object in the cell. Sibling components with same-named actions don't collide.
Structured Data
Scripts can build, read, and modify lists and named records — not just single values. Useful for inventories, score tables, level configs, dictionaries, anything that's "more than a number."
Two shapes:
- Array — ordered list, accessed by position:
[10, 20, 30],scores[0]is10. - Map — named slots, accessed by name:
{alt: 30000, fuel: 100},cfg.altis30000.
Both can nest however deep you like — array of maps, map of arrays, etc. JSON shape exactly.
Building structured data
# Array literal
set scores [10, 20, 30]
set rows [{x: 0.1, y: 0.2}, {x: 0.5, y: 0.6}]

# Map literal
set cfg {alt: 30000, fuel: 100, label: "Pass"}
set deep {weather: {wind: {gust: 5, max: 8}}}
Reading
set first scores[0]              # 10
set numRows length(scores)       # 3
set rowX rows[1].x               # 0.5
set gust deep.weather.wind.gust  # 5
length(value) works on arrays (element count), strings (character count), and maps (key count).
Mutating arrays
push scores 99                   # append at the end → [10, 20, 30, 99]
push first scores 0              # prepend → [0, 10, 20, 30, 99]
insert scores at 2 50            # insert at index 2 → [0, 10, 50, 20, 30, 99]
remove scores[3]                 # remove element at index 3 → [0, 10, 50, 30, 99]
set scores[0] 5                  # replace at index → [5, 10, 50, 30, 99]
If you write past the end (set scores[20] 99 on a 5-element array), missing slots are filled with null. Reading a null slot returns 0 in numeric contexts.
Mutating maps
set cfg.fuel 50                  # change a value
set cfg.weather "snow"           # add a new key
remove cfg.label                 # remove a key
Deeply-nested writes work too — Purl drills into nested maps and only changes the leaf:
set cfg.weather.wind.gust 99 # cfg.weather.wind.max stays untouched
All of this also works on a Data prime — a canvas-level container for structured content. See section 6 for the full story (file imports, the Live toggle, cross-cell access).
The Script Editor
Open with S key (when an object is selected), or right-click → Script. The editor provides autocomplete as you type (events, actions, functions, object names, properties, tags) and real-time validation that flags syntax errors and missing references.
Objects can have multiple script tabs — organize by concern ("INIT", "MOVE", "ACTION"). All tabs share the same self. Scripts can be synced across objects — editing one updates all copies. Assign sync groups from the script editor's sync button or the Structure panel.
Tab order matters for execution. When the same event fires (any event — onTick, onEnter, onMessage, onClick, onOverlap, etc.), Purl runs every matching handler from every tab once, top-to-bottom in tab order. If one tab's logic depends on values another tab computes, put the producer above the consumer so the consumer reads fresh data on the same frame. Tabs reading last frame's value is usually invisible at 60 fps, but for tightly coupled logic — physics drivers, weather → render — keep the dataflow direction matching the tab order.
6. Data
The Data prime is Purl's storage primitive — an object on the canvas whose only job is to hold structured content (arrays, maps, scalars, anything that's "more than a single value"). Use it for inventories, quiz banks, level configs, high score tables, dictionaries, save state, AI memory, anything you'd otherwise build out of parallel scalar variables or grid-cell tricks.
It's invisible at runtime; you see its icon in the structure panel and edit it through the property panel. Scripts read and write its contents using the same syntax you'd use on any object property.
Why a Data prime instead of free variables
Free variables (set score 10) work great for small, ephemeral values. A Data prime adds three things:
- It's visible in the structure panel. You remember it exists. New collaborators see it. You can rename it, delete it, copy it across cells.
- It survives save/load as part of the cell snapshot, like any other object.
- It can be made "live" — a one-toggle switch from "part of the project" to "stored on this device, mutating across plays." See Live vs baked-in below.
- It's cross-cell accessible via
@OtherCell.MyData.dataValue.
Use a Data prime when the data is part of your game's content. Use free variables for one-off accumulators inside a script.
Adding a Data prime
Right-click on the canvas and add Data from the prime menu. It lands as a small icon (no visual body in play mode). Select it and the property panel shows the DataPanel — content summary, Import button, Clear button, and a Live toggle.
Three ways to fill it
1. Import a file. Click Import on the DataPanel and pick a .json file. The parsed value lands in dataValue. The panel remembers the filename and load timestamp so you can see what's loaded at a glance.
Useful for: level configs, dictionaries, quiz banks, route files, any pre-authored dataset you want to bundle with the game.
2. Build it from scripts using the same array/map syntax that works on free variables (see section 5):
set Inventory.dataValue [{item: "potion", count: 3}, {item: "key", count: 1}]
push Inventory.dataValue {item: "shield", count: 2}
set Inventory.dataValue[0].count 5
The path syntax drills as deep as your data — set Game.dataValue.player.stats.hp 100 updates the leaf and leaves the rest untouched.
3. AI authoring (MCP). When you have an AI assistant connected, it can read and modify a Data prime directly through safe, granular tools — appending entries, editing nested fields, never accidentally clobbering unrelated data.
Reading and mutating
A Data prime is just an object with a property called dataValue. Everything you can do to a free variable, you can do to MyData.dataValue:
# Read
set first MyData.dataValue[0]
set hp MyData.dataValue.player.hp
set count length(MyData.dataValue)

# Mutate
push MyData.dataValue 99
set MyData.dataValue.player.hp 100
remove MyData.dataValue[3]
remove MyData.dataValue.config.legacyKey
Mutations are immediate. The new value is visible to every other script the same frame.
Dynamic keys. A bracket index can be a variable, and it works for both lists and maps — a number indexes a list, anything else is used as a map key. That lets you build a lookup table keyed by data:
set MyData.dataValue {}                 # seed the map first
foreach row in Source.dataValue:
  set MyData.dataValue[row.label] row.color   # palette keyed by label
set c MyData.dataValue[someLabel]              # read it back
Seed the container as a map (set x {}) before keyed writes — an empty path that starts undefined is treated as a list.
Live vs baked-in
Every Data prime has a Live toggle on its DataPanel. It picks where the data lives, which is the same thing as deciding whether the data is part of your game or part of the player's installation.
| Live | Storage | Behavior |
|---|---|---|
| off (default) | The project file | Each Play starts fresh from dataValue as authored. Mutations during Play are discarded when the player stops. The data is baked into the game — it ships in the .purl file. |
| on | This device, in the browser's local storage | Each Play picks up where the last one left off. Mutations are saved automatically. The project file no longer carries the value — the player's device does. The data is live — it changes over time and stays per-installation. |
Live OFF is for content the creator ships and the player consumes: level layouts, enemy configs, quiz banks, the static dictionary your puzzle uses, anything that should be the same for every player and the same every Play.
Live ON is for state the game generates that should outlast a single Play: a high score table that grows over time, a player profile, an in-progress sandbox the player is building, accumulated currency, a player-authored route in your route editor.
The toggle migrates the data between the two stores. Turning Live ON copies the current value to this device's local storage. Turning it OFF pulls the latest live value back into the project file — effectively baking whatever's accumulated into your game's static content. (See Authoring with the Live toggle below for one of the most useful workflows this enables.)
Authoring with the Live toggle
A specific workflow worth calling out: you can use the Live toggle as an authoring tool to populate a Data prime via DSL and then bake the result into your project.
- Create a Data prime, leave Live OFF (default).
- Turn Live ON.
- Run Play. Your scripts populate
dataValue—push,set, whatever you need. - Stop Play. The current value is now sitting in this device's local storage.
- Turn Live OFF. The value is pulled into the project file as the prime's new authored content.
- Save. The prime now ships with the data baked in.
You've used the runtime as a content authoring tool — anything you can compute in a script is now static content in your project.
Live primes and shared exports
When you export your project as a .purl file (to share or publish), Live primes ship without their values — local storage is local to whoever created it. The receiver's first Play starts from whatever the prime's authored default was (or empty if there was none). Their first mutation seeds their own local storage. That's what "per device" means: each installation gets its own copy.
If you want to ship pre-loaded content with your game, keep that prime Live OFF — the value travels in the .purl file.
Composition patterns — building memory shapes
The platform gives you the storage primitive. You compose richer structures with multiple Data primes.
Save slots. One Live prime per slot. The save-slot system snapshots in-memory state; Live primes carry whatever you write into them across plays. Combine to taste.
Reset to a known seed. Author two primes — Defaults (Live OFF, holds your reset value as part of the project) and Game (Live ON, what scripts mutate at runtime). To reset, copy one to the other:
# Reset button or onEnter for a fresh-game cell
set Game.dataValue Defaults.dataValue
The Defaults prime is part of your project file and never changes; Game resets to it on demand.
Versioned snapshots. Keep an array of map primes, each one a saved state. Author chooses which to load. Snapshots take and restore in two lines:
push History.dataValue Game.dataValue        # snapshot
set Game.dataValue History.dataValue[2]      # rewind to version 2
Transactional rollback. Pair a Live "committed" prime with a non-Live "tentative" prime. Try changes on Tentative; on confirm, copy across:
set Committed.dataValue Tentative.dataValue
The pattern: instead of asking the engine for "save state" or "checkpoint" features, you build them with the primitives you already have. This stays out of your way until you actually need the shape, and lets you tailor it exactly to your game.
Cross-cell reads
Any Data prime is reachable from any cell using the @CellName.PrimeName.property syntax:
set inv @Inventory.PlayerStash.dataValue
You can drill into the path and index it in one go — no need to copy the reference into a variable first:
set p @Course.Route.dataValue.points[i]
set name @Inventory.Catalog.dataValue.items[slot].name
Useful for HUD primes that read from a Game cell, or shared dictionaries one cell authors and others consume.
Tips
- A Data prime is fully mutable from script — you can wholesale-replace
dataValuewith any new structure (set MyData.dataValue {fresh: "shape"}) at any time. You're not locked into the imported shape. length(MyData.dataValue)works on arrays (count), maps (key count), and strings (character count).- Out-of-bounds writes auto-grow arrays with
nullslots. Reading anullslot returns0in numeric contexts. - Deeply-nested writes only touch the leaf. Sibling keys at every level stay intact.
- To update many elements of a list, loop with
foreachand mutate the element in place (foreach p in MyData.dataValue: set p.x p.x + 1) rather than writing back by index (set MyData.dataValue[i] {...}). In-place field edits stick and stay fast even on large lists; rewriting whole entries by index in a loop gets slow. This is the pattern for per-frame work like moving the vertices of a data-driven polygon. - Live primes survive page reloads, browser restarts, and
delete save— they're independent of the save-slot system. Clearing them takes an explicit Clear button on the DataPanel (which prompts to confirm). - The Live toggle is per-prime, not per-project. Mix Live and non-Live primes freely.
7. Building Principles
Self-Contained Objects
The most important habit in Purl: make every object responsible for its own behavior. An object's scripts should work without knowing about the rest of the project.
Why this matters:
- You can reuse the object in other cells or projects — just copy it
- You can have multiple instances (spawn clones) and they all work independently
- When debugging, you only need to look at one object's scripts
The key tool: self. Always use self instead of hardcoding your object's name:
// WRONG — breaks if you rename or clone the object
onCollide:
  set Tank1.energy Tank1.energy - 10

// RIGHT — works on any instance
onCollide:
  set self.energy self.energy - 10
Example: a coin pickup. The coin handles everything itself — detection, scoring, removal:
// On each Coin object (tagged #coin, sensor enabled)
onOverlap:
  if other is #player:
    set score score + 1
    destroy self with scale 200
Any number of coins can exist. Each one works independently. When an object is truly self-contained, you can export it as a .purlx file (File → Export .purlx) and import it into any other project — it brings its scripts, states, fills, and children along. Build a reusable button, a character, a pickup system, and share it across projects.
Example: a robot with energy. The robot tracks its own data, reacts to its own collisions:
onEnter:
  set self.energy 100

onCollide:
  if other is #projectile:
    set self.energy self.energy - 25
    if self.energy <= 0:
      addTag self #inactive
      disable self movable
      destroy self with fade 500
Runtime Shape Morphing
Polygon vertices and path control points can be moved at runtime from script:
onTick:
  set self.polygonPoints[0].x 0.5
  set self.pathSegments[2].cp1y 0.3 + sin(time) * 0.1
Coordinates are 0–1 normalized within the shape's bounding box, not world coordinates — (0,0) is the top-left of the bbox, (1,1) is bottom-right. This lets a shape resize/rotate as a unit while keeping vertex relationships intact.
To find a vertex index, enter vertex/path edit mode and hover over a handle — the tooltip shows #N. Use that as the array index.
Synced Scripts
This is where self-contained scripts pay off. If every script uses self and doesn't hardcode names, you can sync it across multiple objects — one script, shared by all instances. Edit it once, every object updates.
Setting it up: Right-click an object in the structure panel → Shared Scripts → assign to a sync group. All objects in the same group share the same script blocks.
Example: You have 20 coins in a level. Instead of copying the same script to each one:
- Write the coin script once on one coin (using
self):
onOverlap:
  if other is #player:
    set score score + 1
    destroy self with scale 200
- Sync it to all other coins via Shared Scripts
- Later you decide coins should also play a sound — edit one, all 20 update
The rule: Synced scripts only work if they're self-contained. The moment you hardcode Coin3.opacity instead of self.opacity, syncing breaks — that script only makes sense for Coin3.
This is why self, object variables, tags, and messaging matter. They're not just convenience — they're what makes your scripts reusable.
Where Data Lives
Put data on the object that owns it, not on the object that displays it.
// WRONG — energy lives on the energy bar
onCollide:
  set EnergyBar.energy EnergyBar.energy - 10
  set EnergyBar.width EnergyBar.energy / 100

// RIGHT — energy lives on the subject, energy bar reads it
// On the Tank:
onCollide:
  if other is #projectile:
    set self.energy max(0, self.energy - 10)
    shout "IMPACT"

// On the EnergyBar:
onMessage "IMPACT":
  set self.width self.maxWidth * Tank.energy / 100
Why? Because:
- The tank might be destroyed and respawned — its energy resets naturally with
self - Multiple tanks can each have their own energy
- The energy bar is just a view — swap it for a number display and nothing else changes
Variable Flow
Variables have a lifecycle (how long they live) and a scope (who can see them). The cycle of a play session is Play → Restart → Save → Stop:
- Play starts a run — memory is fresh.
local.*is restored from the browser's previous save, everything else starts empty. - Restart (
restart cell,goto fresh) resets the current cell without ending the run. Cell-scoped state is wiped, run-wide state is preserved. - Save (explicit
save "slot", or the in-app save button) writeslocal.*to disk so it survives a page reload. - Stop ends the run — tab close, page reload, or exit from play. Everything in memory dies; only what was Saved to
local.*remains.
| Scope | Syntax | Lifecycle | Use for |
|---|---|---|---|
| Session (default) | set score 10 |
Cleared on Restart (and Stop) | The current cell's bookkeeping — score, lives, cell flags |
| Game | set game.bossHealth 80 |
Cleared on Stop only (survives Restart) | Cross-cell run state — inventory, unlocked rooms, quest flags |
| Local | set local.highScore 9999 |
Never cleared automatically — survives Stop, written to disk | Leaderboards, preferences, permanent progression |
| Object | set self.energy 100 |
Dies with the object (Restart or destroy) | Per-instance state — each robot has its own energy |
Session / Game / Local variables are global — any object or cell script can read and write them. Object variables are per-instance — each copy of an object carries its own.
How to pick the right scope:
- Does each instance need its own copy? →
self.* - Does it only mean something within a single cell? → unscoped (
set score 10) - Does it need to survive
restart cell/goto fresh? →game.* - Does it need to survive a page reload? →
local.*(and write it through an explicit save)
What game.* is NOT for: per-frame values that change continuously (temperature, altitude, fuel). Those are bookkeeping for one cell, so they're unscoped. game.* is for values that live "above" the cell but "inside" the run — the kind you'd carry from Room A to Room B but wouldn't bother saving to disk.
Common mistake — using global variables for per-object data:
// WRONG — one global "energy" shared by all robots
onEnter:
  set energy 100

// RIGHT — each robot has its own
onEnter:
  set self.energy 100
Passing data between objects: Use shout with parameters, or read properties directly:
// Via message
shout "SCORE" {points: 10}

// On the listener
onMessage "SCORE":
  set score score + points
  set self.content score

// Via property read
set EnergyBar.width EnergyBar.maxWidth * Tank.energy / 100
The value side of set accepts any expression. Arithmetic, comparisons, boolean ops, property access, and function calls all evaluate to a value and get stored. This is especially useful for mirroring game state straight into a visual property:
// Show the sandbag icon only when we have at least one
set self.visible sandbags >= 1

// Toggle a panel's visibility
set Panel.visible not Panel.visible

// Tint based on temperature
set Warning.opacity temp > 80

// Derived values
set Meter.width maxWidth * health / 100
Initialization Pattern
When a cell loads, onEnter fires on the cell and on every object. Use this structure:
Cell onEnter — set up global variables (scores, lives, flags):
onEnter:
  if newGame:
    set lives 3
    set score 0
  shout "READY"
Object onEnter — set up the object itself (enable capabilities, init per-object data):
onEnter:
  enable self movable speed 0.3
  enable self keyboard
  set self.energy 100
Passing global data to objects — don't read globals in onEnter (objects might run before the cell finishes). Instead, shout "READY" from the cell and let objects react:
// Cell:
onEnter:
  set lives 3
  shout "READY"

// LivesDisplay object:
onMessage "READY":
  set self.content lives
This is reliable regardless of execution order. Each object handles its own setup when it hears the signal.
The newGame Guard
When a game is loaded from a save, onEnter fires again but you don't want to reset the player's progress. Use newGame:
onEnter:
  if newGame:
    set lives 3
    set score 0
  // This always runs (whether new or loaded):
  show HUD
  enable Player movable
newGame is true on first visit and goto. It's false when restored from a save.
Case Sensitivity
Variable names are case-sensitive. score, Score, and SCORE are three different variables. Pick a convention and stick with it.
Object names are NOT case-sensitive. Player, player, and PLAYER all refer to the same object.
Common Pitfalls
repeat vs onTick — when to use which.
Use repeat + wait for things that happen on a schedule — spawn a robot every 3 seconds, flash a light every 500ms:
repeat:
  spawn "Robot" {x: random(0, 3), y: 0}
  wait 3000
Use onTick for things that should happen smoothly every frame — rotation, countdowns, fuel consumption:
onTick:
  set self.rotation self.rotation + 90 * deltaTime
Don't use repeat + wait 16 to fake a frame loop — it will drift and won't respect time scale. onTick is built for this.
Don't put wait in onTick. onTick is meant for quick per-frame updates. If you add a wait, the object stops getting tick updates until the wait finishes:
// WRONG — rotation stops for 2 seconds
onTick:
  set self.rotation self.rotation + 90 * deltaTime
  wait 2000
  log "this breaks everything above"
Watch nested repeats. A repeat 100 with an inner repeat 100 runs 10,000 times before anything else happens. The game will freeze visibly. If you need large counts, add a wait 1 in the outer loop so other things can happen between iterations:
repeat 100:
  repeat 100:
    set Grid.cell[x][y].color "red"
  wait 1     // Let the game breathe between batches
Render Order Across Components
Objects inside a component render as a single block — Compo A's children all draw before the renderer moves on to Compo B. That's usually what you want: the component is a logical group, and a transition or opacity tween on it fades the whole group as one. Z-index orders objects within the same scope; it doesn't reach across components.
When you genuinely need a foreign render slot — a tree splitting the player into front/back halves, an effect slotted between rig parts, a chrome layer wedged between two HUD components — use inject:
inject Source above Target
inject Source below Target
clear inject Source
Source keeps its parent, transforms, scripts, and lifetime. Only its render position moves to sit just above (or below) Target in the draw order. Both Source and Target accept names, dotted paths (Compo.Child), self, other, and special refs (parent, siblings, root) — same as anywhere else in the DSL. So inject parent.Pour1 below self.Cup.Front works as expected.
// On a tree branch that should split a player visually
onEnter:
  inject self above Player
Injection is runtime-only — it lives in the script. There's no design-time toggle. Put inject in onEnter: if you want the same arrangement every time the cell is entered. Each play session re-applies it from scratch; nothing is persisted between sessions.
One injection per object at a time; a second inject on the same source replaces the first. clear inject self undoes it.
Reach for this only when component grouping genuinely can't express the layering — most cross-object ordering should be solved with zIndex inside a shared parent, or by restructuring the component tree.
Part 2: Dynamics
8. Overview
The Purl universe has two layers. The static layer is everything visual — backgrounds, decorations, labels, scenery. These objects render on screen but they're like painted scenery in a theatre: nothing can touch them, push them, or bump into them. They exist only for the eye.
The dynamic layer is where interaction happens. The moment you give an object a dynamic behavior — movable, blocking, sensor, draggable, follow, or any other — it enters this layer. Now it can collide, be detected, be grabbed, chase things. A shape with blocking becomes a wall. A shape with sensor becomes a trigger. A shape with movable becomes a physics body that falls, slides, and bounces.
The key rule: objects can only interact with other objects in the dynamic layer. A movable player will pass right through a shape that has no dynamic behavior — it's still in the static layer, invisible to the physics engine. Give that shape blocking and suddenly it's a wall. Give it sensor and it becomes a collectible. This is a common gotcha early on: you set up a player with sensor expecting it to detect coins, but the coins have no dynamic property, so nothing happens. Give the coins sensor too and the overlap fires.
In the editor, most dynamic properties live in the Mov tab (movement, input, follow, path binding) and the Bod tab (blocking, sensor, physics properties like mass, friction, restitution) of the properties panel. You can also enable and configure them via script with enable/disable.
States are not dynamics. States can change position, size, and rotation — but they're not movement. A state change teleports the object to its new position instantly (or interpolates visually with over), but the object doesn't physically travel through the space in between. It won't hit walls, won't trigger sensors, won't fire movement events. States are for changing how an object looks and where it sits — "be here now" — not for traveling somewhere. If you need an object to actually move through space, use moveTo (physical, respects collisions) or transport (visual, fires movement events).
9. Moving Around
You've got your character — maybe a simple shape, maybe a detailed component with animations and states. It looks great, but it just sits there. Time to make it move. Most movement settings live in the Mov tab of the properties panel:
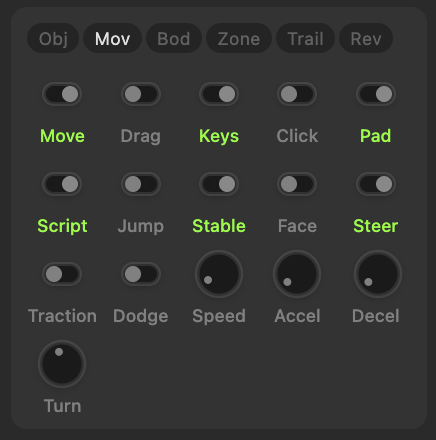
The Foundation: Movable
Everything starts with movable. One line puts an object into the physics engine:
enable Player movable speed 0.5
Now it responds to forces — gravity pulls it down, wind pushes it sideways, collisions stop it. But nobody's driving it yet. It needs an input source — something that tells it where to go. Here's how the different ways of moving an object relate to each other:
| Way of moving | Needs movable? | Respects physics? | Who drives it? |
|---|---|---|---|
keyboard / gamepad |
yes | yes | Player presses keys |
click |
yes | yes | Player clicks destination |
press / release |
yes | yes | Script injects keys |
follow / avoid |
yes | yes | AI chases or flees target |
moveTo |
yes | yes | Script sets destination, object walks there |
jumpable |
yes | yes | Player or script triggers jump |
draggable |
no | optional | Player grabs with mouse/touch |
transport |
no | no | Script slides object to position |
impulse / set velocity |
yes | yes | Script applies force |
set X.x / set X.y |
no | no | Script teleports |
Player Input
The most common setup — let the player control an object directly:
enable Player movable speed 0.5
enable Player keyboard
Keyboard gives you WASD and arrow keys. Gamepad gives you left stick and D-pad. You can enable both — they combine. Click-to-move lets the player click a destination and the object walks there, pathfinding around obstacles.
You can enable the same input on multiple objects — they all respond simultaneously. All objects with click enabled will move toward the same click. All objects with keyboard respond to the same keys. Each object has its own speed and physics, so they arrive at different times and collide independently, but they share the same input source.
enable Player keyboard           // Keys
enable Player gamepad            // Controller
enable Player click              // Click destination
Multiple Controllers
For local multiplayer, you can route specific controllers to specific objects. The index N argument picks which connected gamepad drives an object — 1 is the first connected controller, 2 is the second, and so on (up to 4, the typical browser limit).
enable BlueCar movable speed 0.4
enable BlueCar gamepad index 1   // P1 controller drives this car

enable RedCar movable speed 0.4
enable RedCar gamepad index 2    // P2 controller drives this car
Each car only responds to its assigned controller's stick + D-pad. enable X gamepad with no index defaults to controller 1.
For controller buttons, every connected controller fires its own indexed key events: gamepad-1-a, gamepad-2-a, gamepad-3-up, etc. The suffix names are a, b, x, y, up, down, left, right.
onKeyDown "gamepad-1-a":          // P1 A button
  shout "P1_FIRE"

onKeyDown "gamepad-2-a":          // P2 A button
  shout "P2_FIRE"
Controller 1 also fires the unindexed names (gamepad-a) and keyboard equivalents (Space for A, Escape for B, e for X, q for Y, arrows for D-pad) — so single-controller games written before this feature keep working unchanged. Controllers 2+ only fire their indexed names, so a second player can't accidentally trigger keyboard-only handlers.
Script-Driven Input
press and release inject key events as if the player pressed them. The object doesn't know the difference — it moves exactly as it would from a real keypress.
// Auto-walk: keep moving right
onEnter:
  press "ArrowRight"

// Scripted sequence: walk left, wait, jump
onEnter:
  press "ArrowLeft"
  wait 2s
  release "ArrowLeft"
  press "Space"
  wait 100ms
  release "Space"

// One object controlling another
onClick:
  press "Space" on Player       // Virtual fire button
  wait 100ms
  release "Space" on Player
This is how you build AI — and it reveals a powerful design pattern:
Build once, control any way. Start by building a fully self-contained object — a tank that moves, rotates, shoots, animates its treads, takes damage, shows smoke. Wire it all to keyboard input. Test it as a player-controlled unit until it works perfectly. Every behavior is driven by key events: onKeyDown "Space" to fire, onKeyDown "q"/"e" to aim, arrow keys to drive.
Now copy it. Add one child — a large invisible sensor as a detection zone. Give the sensor a script that detects enemies via onOverlap, computes bearing with atan2, and sends press "q"/"e"/"Space" on parent. Switch the tank's input from Keyboard to Script (or add Script alongside Keyboard). The tank's own scripts handle script-injected keys exactly like physical ones — no AI-specific code on the tank itself. You just added intelligence by connecting a new input source to the existing controls.
Copy that AI tank again. It just works — every copy is independent, with its own sensor, its own targeting, its own state. Ten enemy tanks from one design, zero duplication of game logic.
This pattern scales: the same tank can be player-controlled (Keyboard input), AI-controlled (Script input + sensor with press/release), or both (add both input types). The tank doesn't know or care who's pressing the keys. That's what makes Purl objects truly reusable — the control interface is always keys, the intelligence lives outside.
Per-object key isolation: When you press "ArrowUp" on "EnemyTank", only that specific object sees the key. It doesn't leak into the player's controls or other AI objects. Physical keyboard input and script-injected keys are completely independent.
Key Remapping
You can remap or disable individual movement keys per object at runtime:
// Remap to WASD
onEnter:
  set self.keys.up "w"
  set self.keys.down "s"
  set self.keys.left "a"
  set self.keys.right "d"

// Disable downward movement (e.g., one-way platformer)
onEnter:
  set self.keys.down "none"

// Remap jump to a different key
onEnter:
  set self.keys.jump "w"
Setting a direction to "none" disables it — no key will trigger movement in that direction. You can read the current mapping with self.keys.up, which returns the key name or "none" if disabled. Changes take effect immediately.
Key names are case-insensitive. "ArrowLeft", "arrowleft", "w", and "W" all refer to the same key everywhere keys are named — onKeyDown/onKeyUp filters, self.keys.* remaps, and press/release. Write them however reads best; mismatched case never silently misses.
Autonomous Movement
Objects that move on their own without player or script input:
Follow and avoid — chase or flee a target using the object's own speed and physics:
enable Dog follow "Player"                    // Run to player
enable Guard follow "Player" distance 0.2     // Keep 0.2 away
enable Robot avoid "Player" distance 0.3      // Flee when closer than 0.3
Followers pathfind around obstacles and respect collisions. Player input always overrides follow direction. followDistance is readable/writable at runtime.
MoveTo — send an object to a position. It walks there using its own speed, pathfinding around walls:
moveTo self 0.5 0.5
moveTo self Checkpoint.x Checkpoint.y

onArrive:                                     // Fires when it gets there
  moveTo self NextWaypoint.x NextWaypoint.y   // Patrol loop
Use onArrive (not onStop) for waypoint logic — onStop fires for any pause, onArrive only on actual arrival.
Path binding — constrain movement along a drawn path (trains, roller coasters, elevators):
enable Train movable speed 0.3 path "Track"
Draw a line or curve, name it, make it invisible. The object slides forward and back along the path, auto-rotating through curves. Closed paths loop, open paths stop at endpoints.
Connecting a train: bind all carriages to the same path with the same speed, acceleration, and deceleration, and give them the same input. They all respond to the same keys and move in lockstep along the track.
Why not use pegs? You can connect path-bound objects with pegs, but it often feels wrong — the rigid connections fight the curves and create invisible resistance. Shared input or follow chains give much smoother results for objects on paths.
Dragging
Dragging is separate from movable — it's its own system for letting players grab objects with mouse or touch:
enable Piece draggable
enable Piece draggable collision         // Respects walls while dragging
enable Piece draggable discrete occupy   // Grid snap, rejects occupied cells
Objects with an axis constraint (axis x or axis y) can only be dragged along that axis — perfect for sliders and levers. onDragStart, onDrag (every frame), onDragEnd fire during the drag. A quick tap counts as a click, tap + movement starts a drag.
Modifier keys. Inside onClick and the drag handlers you can read whether a modifier was held: shiftKey, ctrlKey, altKey, metaKey (Cmd on macOS, Win on Windows) are true/false. They're captured the instant the gesture begins, so the same value holds through the whole onClick → onDragStart → onDrag → onDragEnd sequence. Use them to layer secondary actions onto an existing click — e.g. plain click selects, shift+click adds to selection. Prefer ctrlKey for cross-platform shortcuts:
onClick:
  if shiftKey:
    shout "ADD_TO_SELECTION"
  else:
    shout "SELECT"
Scripted Repositioning
Moving objects from script without player involvement:
transport self to 0.5 0.5 over 500           // Smooth slide, ignores physics
set self.x 0.5                               // Instant teleport
impulse self 0.3 -0.5                        // Add velocity (knockback, launch)
set self.velocityX 0.5                       // Set exact velocity
Transport doesn't need movable and ignores all physics — the object glides through walls and blockers. Impulse adds to existing velocity. Set velocity replaces it.
Tuning The Feel
The difference between a tight platformer and a floaty space game is in three numbers:
// Tight platformer
enable Player movable speed 0.5 acceleration 0 deceleration 0.1

// Floaty spaceship
enable Ship movable speed 0.3 acceleration 1 deceleration 3

// Heavy tank
enable Tank movable speed 0.15 acceleration 0.8 deceleration 0.5
| Parameter | Default | What it does |
|---|---|---|
speed |
0.3 | Maximum velocity |
acceleration |
0 | Seconds to reach max speed (0 = instant) |
deceleration |
0.3 | Seconds to stop (0 = instant, 3+ = ice) |
Stable
By default, all movable objects use physics collision — they bounce, transfer momentum, and push each other. This is correct for most situations: platformer characters, balls, crates, projectiles.
Stable is a special mode for when two movable objects collide and you want them to stop cleanly instead of bouncing off each other. Think vehicles in a top-down game: two tanks meet head-on and just stop, no ricocheting. Enable it explicitly:
set Tank.stable true
Don't use stable for platformers with gravity — the physics path handles floors, walls, and slopes correctly. Stable is specifically for movable-vs-movable contact in situations where momentum transfer would look wrong.
Movement Modes
By default, objects move freely in all directions. Constrain them for different game types:
Axis lock — sliders, elevators, side-scrollers:
enable Elevator movable axis y           // Only up/down
enable Runner movable axis x             // Only left/right
Steering — vehicles. Up/down drives forward/backward, left/right rotates:
enable Tank movable speed 0.3 axis forward steer 0.8 traction dodge
Facing — rotate to face velocity direction (projectiles, fish, arrows):
enable Arrow movable speed 0.5 facing
Jumping
Add gravity to the cell, then enable jumping:
set Cell.gravity 1.5
enable Player jumpable height 0.8
enable Player jumpable height 0.8 multijump 2    // Double jump
Mass-independent, resets on landing. Works without gravity too.
Reacting to Movement
Movement events are where you connect physics to visuals — flip the sprite when changing direction, play a walk animation when moving, switch to idle when stopping:
onMove "left":
  set self.flipX true
  animate self "Walk" loop

onMove "right":
  set self.flipX false
  animate self "Walk" loop

onStop:
  stop animate self
  set self.state "Idle"

onJump:
  set self.state "Jump"

onLanding:
  set self.state "Idle"
| Event | When |
|---|---|
onMove "dir" |
Starts moving (up/down/left/right) |
onStop |
Stops (any reason) |
onArrive |
Reached moveTo destination |
onJump / onLanding |
Jump and land |
You can also read movement status at any time:
| Property | What it is |
|---|---|
moving |
Is it moving? |
direction |
up, down, left, right, none |
velocityX, velocityY |
Current velocity |
moveAngle |
Direction in degrees |
moveSpeed |
Speed magnitude |
movedSinceSpawnX, movedSinceSpawnY |
Signed displacement from where the object spawned (or where it started in the cell). Negative if moved up/left. Goes back to zero if the object returns to its starting point. |
distanceTraveled |
Total path length the object has walked, run, drifted, or been carried since spawn. Always grows; never shrinks. Skips teleports — set self.x 0.5 doesn't add to the count. |
movedSinceSpawnX/Y and distanceTraveled are useful for spacing things out (spawn the next platform 1.0 unit above the highest one), pacing checkpoints (give a reward every 5 units of travel), stamina/odometer effects, or just knowing "how far has this thing moved" without rolling your own counter.
wait movement pauses a script until objects stop moving. wait movement self waits for one specific object.
When does it take effect?
Some script writes apply this frame and are visible immediately. Others apply next frame because the engine's physics step has already run before your onTick fires. Two simple rules cover almost everything:
- Position writes are this-frame.
set self.x 0.5,set self.y 0.2, applying a state preset that includes a position delta — these teleport immediately. The renderer sees the new position this same frame. - Motion writes are next-frame.
set self.velocityY -0.3,impulse self 0 -0.5,set self.angularVelocity 30,set self.gravityScale 2,transport self to ...,moveTo self ...— these all schedule a change that the next physics tick consumes. The motion you wrote starts ~1 frame later.
Visual property writes (set self.rotation, set self.fillColor, set self.opacity, etc.) are this-frame too — they're not motion, they're appearance.
Why this matters: a tight feedback loop in onTick can be off by one frame:
onTick:
  if self.y > 0.8:
    set self.velocityY 0 - 0.3   # bounce
The condition fires when the object reaches y = 0.81. The velocity flips on the next tick — by that point the object has continued upward by one more frame's worth of motion. At low speeds this is invisible (sub-pixel). At high speeds the object visibly overshoots its trigger point by one frame.
If you need an immediate course-correction, write the position directly: set self.y 0.8 clamps it this frame. If you need a velocity change to feel instant, accept that one frame of latency is normal — most player-facing motion doesn't notice 16 ms.
Rule of thumb:
| Want | Use | Timing |
|---|---|---|
| Snap to a position right now | set self.x 0.5 |
this-frame |
| Smoothly tween to a position | transport self to 0.5 0.5 over 500 |
next-frame start, then continuous |
| Push something via physics | impulse self 0 -0.5 or set self.velocityY -0.5 |
next-frame |
| Spin something at a fixed rate | set self.angularVelocity 30 |
next-frame |
| Change visual appearance | set self.opacity 0.5 |
this-frame |
Trails
Moving objects can leave a visual trail behind them — a tapered streak that follows the object's path. Enable in the Trail tab or from script:
set self.trail true
| Property | What it controls |
|---|---|
trailLength |
How far the trail extends behind the object (world units, default 0.3) |
trailWidth |
Width multiplier relative to min(width, height) (default 1) |
trailOpacity |
Starting opacity (default 0.3) |
trailScale |
Taper — tail/head width ratio (0 = pointed, 1 = uniform, default 0.3) |
trailColor |
Trail color (default: object's fill color) |
Trails work on individual primes, not on components as a whole. If you need a trail on a component, enable it on the specific child that should leave the streak. They scale automatically when the object resizes.
10. Making Contact
Your character can move now, but it walks and falls through everything. To build a world it can interact with — walls, floors, platforms, ice, trampolines — you need surfaces. Most of these settings live in the Bod tab:
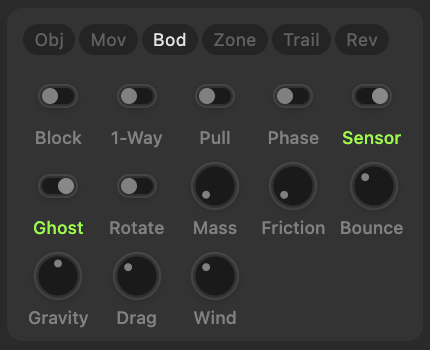
Making Things Solid
Any object becomes a wall or a floor by enabling blocking:
set Wall.blocking true
That's it. Now movable objects can't pass through it (unless told to do so specifically). The wall doesn't need to be movable itself — it just sits there and stops things. Most levels are built from a handful of blocking shapes: rectangles for walls and floors, polygons for slopes, invisible blockers for boundaries.
Conditional blocking lets you create doors and barriers that open based on game logic. Expressions can reference self (the blocker) and mover (the object trying to pass):
set Door.blocking "mover.hasKey == false"              // Blocks until mover has the key
set ColorWall.blocking "self.color != mover.color"     // Only matching colors pass
Surface Properties
Surfaces aren't just solid — they have physical properties that affect how movers interact with them:
Friction controls how slippery the surface is. Low friction = ice, high friction = carpet:
set Ice.friction 0.1       // Slippery — objects slide
set Carpet.friction 0.8    // Sticky — objects stop quickly
Restitution controls bounciness. 0 = instant stop, 1 = full bounce. This works even on stable objects — a player landing on a trampoline bounces regardless of their stable setting:
set Trampoline.restitution 0.9    // Very bouncy
set Mud.restitution 0             // Absorbs all energy
One-Way Platforms
A classic platformer building block — blocks from above, lets objects jump through from below:
set Platform.oneWay true
set Platform.blocking true
How Different Objects Interact with Surfaces
Not all movers interact with surfaces the same way. A player character stops cleanly at a wall. A ball bounces off it. A projectile passes through some and hits others. Here's the full picture:
| Role | Stops others? | Stopped by blockers? | Use for |
|---|---|---|---|
| Blocker | Yes | Yes | Walls, floors, platforms, crates |
| Normal (default) | No | Yes | Players, NPCs — stopped by walls but don't stop others |
| Phase | No | Selective | Projectiles that pass through some blockers (affects #tag) |
| Ghost / Sensor | No | No | Triggers, decorations, effects |
Objects with stable enabled stop cleanly on mover-vs-mover contact (no momentum transfer). All objects respect surface friction and restitution.
Sensors
A sensor detects when another dynamic object enters or leaves its area. It doesn't block anything — objects pass right through it. Think of it like a tripwire: it notices contact but doesn't stop it.
set Coin.sensor true
onOverlap:
  if other is #player:
    set score score + 1
    destroy self

onOverlapEnd:
  log "left the zone"
Remember: both objects must be in the dynamic layer for overlap to fire. The coin needs sensor, and the player needs movable (or any other dynamic behavior).
Ghost
Ghost is set on the object being hit — "nothing collides with me." A ghost object lets everything pass through it. Sensors are automatically ghost (they detect but don't block). You can also make any object ghost to prevent it from interfering with collision — useful for decorative component children like shadows, glows, or visual effects that shouldn't catch on walls.
set Shadow.ghost true
If you need an object that both detects overlap AND is stopped by walls (e.g., a collectible that can be trapped in a corner), enable sensor but turn ghost off:
set Coin.sensor true
set Coin.ghost false
Component Collision Shapes
A component is a group of objects, so what shape does the physics engine use for collision? By default (depth 0), it uses the component's bounding rectangle — a box around the whole group.
Example: A tank component has a hull and a long barrel sticking out. At depth 0, the whole component is one collision shape — you can't control which parts are solid and which aren't. The bounding rectangle includes the barrel, so the tank gets caught on walls the hull would fit through. Set depth to 1, and each child becomes an independent collision body. Now you can set the barrel to ghost so it passes through everything, while the hull stays solid. Without depth 1, there's no way to make part of a component ghost.
| Depth | What the engine collides with |
|---|---|
| 0 | The component's bounding rectangle |
| 1 | Each direct child's own shape |
| 2+ | Shapes from children nested that deep |
Phase
Phase is set on the object that's moving — "I choose what I collide with." Ghost and phase may seem similar, but they work from opposite sides: ghost says "nothing hits me" (on the blocker), phase says "I ignore certain blockers" (on the mover). The classic use: a projectile that passes through friendly units but hits obstacles.
enable Ball phase affects #friendly    // Passes through #friendly blockers, stopped by everything else
enable Ball phase                      // Passes through ALL blockers
Phase objects still trigger sensor overlaps — they only ignore blocking, not detection.
Collision Events
onCollide fires when a moving object hits a blocker:
onCollide:
  if other is #hazard:
    goto "GameOver"
Momentum Transfer
When a movable+blocking object hits another movable object, momentum transfers:
enable Player movable speed 0.5
set Player.blocking true
set Player.mass 3

enable Crate movable
set Crate.blocking true
set Crate.mass 1       // Player pushes crate
Visual vs Collision Footprint
Every object has two footprints. The visual footprint is what the player sees — the full rendered shape with all its details. The collision footprint is what the physics engine uses for blocking, overlap detection, and level/ramp calculations. These can be completely different.
Back to the tank example: visually it's a hull + barrel + turret. But with depth 1 and the barrel set to ghost, the collision footprint is just the hull. The barrel renders on screen, rotates, looks great — but blocking collision ignores it. The tank fits through doorways the visual barrel would clip through.
This separation is fundamental. You design how things look, then independently control how they collide. A character can have flowing hair and a cape that are ghost (visual only), while its collision is just a simple body shape. For levels and ramps, the visual footprint determines how the object is scaled and rendered at different elevations (see Levels & Ramps), while the collision footprint determines what it actually hits.
Pulling Things
Pushing is walking into something — the collision system handles it automatically. But what about pulling? You walk away from a crate and it follows you. Enable pullable on the object you want to pull:
set Crate.pullable true
Now hold Shift (or left trigger on gamepad) while moving, and any nearby pullable object gets dragged along. The pull uses the same physics as pushing — mass determines how quickly the pulled object accelerates. A heavy crate takes a few moments to get moving; a light box responds instantly.
On a grid (snapToCell), pull is discrete: move away from an adjacent pullable and it slides into the cell you just vacated. If the pullable can't follow (something blocking its path), you can't move either — you're gripping it. This is how the Push The Crate example works: push by walking into crates, pull by holding Shift and walking away.
Off a grid (free movement), pull works through a phantom push — an invisible force pushes the pullable from behind in your movement direction. The pullable accelerates naturally under its own physics, respecting collisions and surface properties. Mass matters: pulling a heavy object slows you down, matching the feel of pushing it. For rotatable pullables, the force is applied at the surface point opposite your position, so pulling from an off-center angle creates rotation.
The pullable property is a simple toggle — enable it in the properties panel (Bod tab) or via script. It works with any movable+blocking object, on or off a grid. Combine it with mass, friction, and blocking to create puzzles where the player needs to maneuver objects by pushing and pulling from different sides.
11. Natural Forces
So far your objects move because something drives them — keyboard, follow, scripts. But in the real world things also fall, blow in the wind, and slow down on their own. These forces act on every movable object in a cell automatically. Set them in the cell properties:
Gravity, Wind, and Drag
Three cell-level forces shape how your world feels:
Gravity pulls everything down. Set it to 0 for a top-down game, positive for a platformer, negative for a "fall up" effect. Gravity is mass-independent — a feather and a boulder fall at the same rate (just like real vacuum physics).
set Cell.gravity 1.5
Wind pushes objects in a direction. Unlike gravity, wind IS mass-dependent — light objects blow harder, heavy ones resist. Use it for weather, conveyor-like effects, or to push objects off ledges.
set Cell.wind 0.5
set Cell.windAngle 0    // 0=right, 90=down, 180=left, 270=up
Drag is air resistance — it slows moving objects down. Without drag, a moving object coasts forever. Higher drag means objects stop sooner. It's what gives your world a sense of thickness — zero drag feels like space, high drag feels like water.
set Cell.drag 0.1
Mass
Mass affects how forces and collisions interact with an object. By default, mass equals the object's area (width × height). A small ball is light, a large crate is heavy — automatically.
Watch out for components: there is no mass setting on a component — its mass is always the sum of all its children's masses. A tank made of 10 children sums ALL their areas, which can make it surprisingly heavy. It barely reacts to wind, resists being pushed, and feels sluggish to accelerate. To compensate, boost the specific force modifier (set Tank.windScale 5) or reduce the mass of individual children.
| Force | How mass matters |
|---|---|
| Gravity | Doesn't — everything falls the same |
| Wind | Heavy objects resist, light objects blow away |
| Collisions | Heavy objects push light ones harder |
| Input | Heavy objects are sluggish to accelerate |
Per-Object Overrides
Every object inherits the cell's gravity, wind, and drag. Override per-object when you need exceptions:
set Balloon.gravityScale 0.1    // Barely affected by gravity — floats
set Feather.windScale 3         // Extra sensitive to wind
set Puck.dragScale 0            // No air resistance — slides forever
Applying Force from Script
Two ways to push objects from script:
Impulse adds to existing velocity — use for launches, knockback, explosions:
impulse Ball 0.3 -0.5
impulse self random(-0.2, 0.2) -0.5    // Random scatter
Set velocity replaces velocity entirely — use when you need exact control:
set Ball.velocityX 0.3
set Ball.velocityY -0.5
Rotatable
Enable angular physics and objects start tipping, spinning, and responding to torque. An off-center collision makes the object rotate. If the center of mass leaves the support base, it tips over.
set Box.rotatable true
Read rotation speed with angularVelocity.
Physics Zones
What if different parts of your level need different physics? A water area with low gravity and high drag. A wind tunnel. An ice patch. A conveyor belt. A ladder. Any object can become a zone that overrides cell physics for objects inside it:
enable WaterRegion zone gravity 0.3 drag 0.8
enable WindTunnel zone wind 5 windAngle 0
enable Conveyor zone flowX 0.3
enable IcePatch zone drag 0
enable Ladder zone gravity 0
disable WaterRegion zone
| Parameter | What it does |
|---|---|
gravity |
Override gravity (0 = weightless) |
wind / windAngle |
Override wind |
drag |
Override drag (0 = frictionless, 1 = thick) |
flowX / flowY |
Constant drift — mass-independent, like a conveyor or river current |
Wind vs Flow: Wind is a force — mass matters, light things blow more. Flow is a velocity — everything moves at the same speed regardless of mass.
When zones overlap, the smallest zone wins. An object is "in" a zone when its center falls inside the zone's collision shape.
12. Structures
Sometimes you need objects physically connected — a pendulum swinging from a ceiling, a bridge made of planks, a wrecking ball on a chain, a catapult arm under tension. Pegs and springs let you build these structures.
Pegs
A peg connects two objects at a single point, like a nail through two boards. Add one from the library, position it where you want the connection, then assign the two bodies in the Peg properties panel.
There are two types:
- Pin (default) — a hinge. The connected bodies rotate freely around the peg point. Think door hinges, pendulums, swinging platforms.
- Weld — a rigid joint. The bodies are locked at a fixed angle. Think a sign welded to a pole, or a catapult arm fixed to its base.
Anchoring to the canvas: Leave Body B empty and the object is pinned to the world itself — it swings but can't move. This is how you make pendulums and fixed pivot points.
Chaining: Connect multiple objects in sequence — canvas → arm → ball — and you get a wrecking ball. Each peg connects two adjacent bodies.
Damping controls how quickly swinging dies down. Zero means it swings forever, higher values slow it down faster:
set Peg1.pegDamping 0.3
Springs
A spring is a soft connection between two pegs. Unlike a rigid peg, it allows stretching and compression — the connected objects bounce toward and away from each other.
set Spring1.springStiffness 20     // How elastic (0 = rigid rod, higher = bouncier)
set Spring1.springDamping 1        // How quickly bouncing dies down
Breaking
Both pegs and springs can break when the force on them exceeds a threshold. Set breakForce to enable it — when the connection snaps, onBreak fires on the peg or spring:
set Peg1.pegBreakForce 100

onBreak:
  spawn "Sparks" {x: self.x, y: self.y}
  destroy self
Recipes
| Structure | How to build it |
|---|---|
| Pendulum | Pin peg. Body A = the swinging object, Body B = empty (anchored to canvas) |
| Wrecking ball | Chain of pin pegs: canvas → arm → ball |
| Rope bridge | Pin pegs connecting planks in a row, both ends anchored to canvas |
| Catapult | Weld peg for the arm (rigid), spring for tension |
| Breakable joint | Any peg or spring with breakForce set — snaps under load |
13. Grids
A huge number of games live on grids — puzzles, board games, match-3, chess, sokoban, card games, RPG maps, inventory screens, tile-based adventures. Purl's Grid object turns any of these from a hard problem into a straightforward build.
How Grids Work
A Grid is an invisible object that divides a rectangular area into rows and columns. Other objects snap to it and move cell-by-cell instead of freely. Position becomes cellX / cellY (integers) instead of x / y (floats). This changes everything — you stop thinking in pixels and start thinking in tiles.
Setting up:
- Add a Grid from the Add menu. By default it's invisible in play mode — just the coordinate system. Turn on visibility in properties if you want grid lines rendered (useful for board games, chess, etc.).
- Set its size, rows, and columns in the properties panel.
- Attach objects to it — select the object, go to the Obj tab, and pick the grid from the Snap to Grid dropdown. Or set it via script:
set Piece.snapToGrid "Board" - Position them:
set Piece.cellX 2,set Piece.cellY 3
Once an object is attached to a grid, it snaps to grid cells in Build Mode — hold Shift while dragging to snap to the nearest cell. This makes level design precise without manually calculating positions. In Play Mode, movement becomes cell-by-cell automatically.
You can layer multiple grids on top of each other — objects only see occupants on their own grid. A background terrain grid and a foreground piece grid can overlap without interfering. Objects still respect normal z-order regardless of which grid they belong to.
Movement Styles
When a grid object moves to a new cell, it doesn't just teleport (unless you want it to). Choose how it gets there:
| Style | Effect | Good for |
|---|---|---|
teleport |
Instant snap (default) | Card games, inventory |
slide |
Smooth glide | Puzzle pieces, sokoban |
jump |
Arc motion (hop) | Characters on a board |
fade |
Fade out, reappear | Teleportation, magic |
Set on the movable: enable Piece movable style slide
Dragging on Grids
Grid objects can be made draggable with special grid-aware options:
enable Piece draggable discrete            // Drag cell-by-cell, snaps to grid
enable Piece draggable discrete occupy     // Same, but rejects drop if cell is taken
enable Piece draggable discrete collision  // Same, but respects blockers
This is how you build drag-and-drop puzzles, chess, inventory systems — the player grabs a piece, drags it along the grid, and drops it in a valid cell.
Cell Data
Every cell in a grid can store arbitrary data — think of it as a dictionary per tile. This is separate from which objects are sitting on the cell. In fact, you don't need to snap any objects to a grid at all — a grid can serve as a pure 2D data structure for storing and querying anything organized in rows and columns. Use it to mark territory, store tile types, track game state, or model any grid-shaped data:
set Board.cell[3][4].owner "red"          // Mark who owns this cell
set Board.cell[0][0].type "wall"          // Mark as wall
set Board.cell[x][y].visited true         // Track visited tiles
Read it back:
if Board.cell[3][4].owner == "red":
  log "Red owns this cell"
Querying the Grid
Grid functions let you ask questions about the board state — essential for game logic, win conditions, and AI:
Occupancy — which cells have objects on them:
if isEmpty("Board", 3, 4):                // Is this cell free?
  set Piece.cellX 3
  set Piece.cellY 4

set free emptyCells("Board")              // All empty cells as [{x, y}]
Cell data queries — find cells by their stored data:
set redCells cellsWhere("Board", "owner", "==", "red") // All cells owned by red
Flood fill — find connected groups of cells with the same value (match-3, territory, connected regions):
set group floodfill("Board", 3, 4, "color", "blue")       // All blue cells connected to (3,4)
if length(group) >= 3:
  foreach cell in group:
    clear Board.cell[cell.x][cell.y]
Line of sight — can one cell see another without blocked cells in between:
if canSee("Board", self.cellX, self.cellY, target.cellX, target.cellY, "wall"):
  log "Clear line of sight"
Pathfinding — A* path between two cells, avoiding blocked cells:
set path pathfind("Board", self.cellX, self.cellY, target.cellX, target.cellY, "wall")
foreach step in path:
  set self.cellX step.x
  set self.cellY step.y
  wait movement self
Maze generation — fill a grid with a procedural maze:
generateMaze("Board", "wall") // Sets cell data: wall=true for walls, wall=false for passages
AI for "N in a row" games — minimax plays any two-player game where you take turns placing pieces on empty cells and the first to get N in a row (horizontal, vertical, or diagonal) wins. Tic-tac-toe, Connect-4, Gomoku, and similar.
Given the current board, it looks ahead several turns and returns {x, y} — the best cell for the AI to play next (or 0 if the board is full).
| Parameter | What it means |
|---|---|
| Grid name | Which grid to analyze |
| Property | Cell data property storing who owns each cell (e.g., "mark") |
| AI value | What the AI places (e.g., "O") |
| Human value | What the human places (e.g., "X") |
| Depth | How many moves to look ahead (4-6 recommended — higher is smarter but slower) |
| Empty value | What empty cells contain (default: 0) |
| Win length | How many in a row to win (default: 4, use 3 for tic-tac-toe) |
| Drop | Pass "drop" for Connect-4 style (pieces fall to lowest empty row per column). Omit for free placement |
Examples:
// Tic-tac-toe — place anywhere
set move minimax("Board", "mark", "O", "X", 6, 0, 3)
if move != 0:
  set Board.cell[move.x][move.y].mark "O"

// Connect-4 — column drop
set move minimax("Board", "owner", "Yellow", "Red", 5, 0, 4, "drop")
if move != 0:
  set Board.cell[move.x][move.y].owner "Yellow"
Part 3: Connecting the Dots
14. Hello World
Your scripts often need to know what's happening around them. Is the player nearby? How many robots are left? What's the closest coin? Is anything touching the paddle? Purl gives you functions to ask these questions.
How Far, How Close, Who's There
A robot needs to know if the player is in range. A magnet needs to find the nearest metal object. A bomb needs to know if anything is within blast radius.
Distance — how far apart are two objects:
if distance(self, Player) < 0.3:
  enable self follow "Player"
Nearby — returns an array of {name, x, y, distance} objects within a radius, sorted closest first. Loop through them with foreach:
set targets nearby(self, 0.3)              // All dynamic objects within 0.3
set robots nearby(self, 0.5, #robot)      // Only #robot tagged objects

foreach e in robots:
  set e.energy e.energy - 10              // Impact everything in range
Nearest — returns a single {name, x, y, distance} object, or 0 if nothing found. Store it in a variable, then read its fields:
set target nearest(self, #coin)
if target != 0:
  moveTo self target.x target.y           // Walk toward the nearest coin
  log target.name                         // Its name
  log target.distance                     // How far away it is

set secondClosest nearest(self, #robot, 2)  // 2nd nearest robot
Intersects — are two objects physically overlapping right now (SAT collision test):
if intersects(Paddle, Crate):
  set Crate.energy Crate.energy - 10
All spatial queries are level-filtered — they only find objects at the same elevation level. Objects at level ALL (-999) are found from any level. See Levels & Ramps.
Finding Free Space
Need to place something where it won't be stuck inside a wall? randomFree() finds a random unblocked position within a radius:
// Wander near current position
set target randomFree(self, 0.3)
if target != 0:
  moveTo self target.x target.y

// Wander around a fixed home point
repeat:
  set target randomFree(homeX, homeY, 0.3)
  if target != 0:
    moveTo self target.x target.y
    wait movement self
    wait 1s
Returns {x, y} or 0 if no free spot found. Uses the pathfinding bitmap — only returns positions clear of static blockers.
Counting and Checking Groups
When you need to know about groups of objects — are all the switches flipped? How many robots remain? Is any door still open?
if all #switches.on == true:           // Every switch is on
  show ExitDoor

if any #robots.energy > 0:            // At least one robot active
  set self.content "Keep going"

set remaining count #coins              // How many coins exist
set alive count #robots.energy > 0     // How many robots have energy > 0
Tag checks in collision/overlap handlers:
onCollide:
  if other is #robot:
    set self.energy self.energy - 10
  if other is not #friendly:
    destroy other
15. Camera
The camera controls what the player sees — and it's completely independent of cell size. A 1×1 cell can be zoomed into so the player only sees 10% of it. A 5×3 cell can be zoomed out to show everything at once. Cell size shapes your world; the camera shapes the view. Does the camera follow the character? Can the player drag to pan? Is there a HUD pinned to the screen? How much depth do background layers create? This is where camera settings matter.
Viewport and Aspect Ratio
The viewport is what the player sees. At zoom 1, the viewport height equals 1 cell unit. Its width depends on the aspect ratio — set in Game Settings. A 16:9 ratio means the viewport is 1.78 units wide. A 1:1 ratio (default) is square. Zoom in and the viewport shrinks, showing less of the world. Zoom out and it grows.
If the player's screen doesn't match the aspect ratio, the export letterboxes (black bars).
Practical advice: Unless you have a specific layout requirement, auto-adjust the aspect ratio to fill the player's screen — no letterboxing on any device:
onEnter:
  set Camera.aspectRatio Screen.aspectRatio
Different devices have different screen proportions — a phone in portrait is tall and narrow, a desktop monitor is wide. Clamping zoom prevents very wide or very tall screens from revealing too much of the world:
  if Camera.zoom < 0.5:
    set Camera.zoom 0.5
Following a Subject
The most common camera setup: make the camera follow the player.
enable Player subject
The camera smoothly tracks the subject as it moves through the cell. You can assign, unassign, and reassign subjects at any time — switch who the camera follows based on what's happening in the game. A cutscene can follow a door opening, then snap back to the player. A race can switch between contestants. A puzzle can focus on the piece being moved.
enable Player subject                       // Camera follows Player
disable Player subject                      // Stop following
enable Door subject                         // Now follows the Door
set Camera.subjectTransition 500            // Smooth 500ms pan when switching
You can enable subject on multiple objects at once — the camera tracks their center point. Be careful with this: if subjects move far apart, the camera zooms out or sits awkwardly between them. It works best when subjects stay near each other.
Dead zone — how much the subject can move before the camera follows. At 0, the subject is always perfectly centered. At 0.4 (default), the subject can wander the middle 40% freely. At 1.0, the camera only moves when the subject pushes against the viewport edge. Tweak this based on how tight or loose you want the camera to feel.
Parallax
Objects can scroll at different rates to create depth. Set perspectiveX and perspectiveY on an object:
1(default) — scrolls normally with the camera0— stays fixed in place (doesn't scroll at all — like a sky or distant mountain)- Values between 0 and 1 — scrolls slower than the camera (background layers)
- Values above 1 — scrolls faster (foreground elements)
set Mountains.perspectiveX 0.3     // Slow scroll — far background
set Clouds.perspectiveX 0.1        // Very slow — distant
set Bushes.perspectiveX 0.8        // Almost normal — near background
set FrontGrass.perspectiveX 1.2    // Faster than camera — foreground
Layer several objects at different rates and you get a convincing sense of depth as the camera moves.
Important: Objects with parallax values other than 1 will appear in different positions during play than in build mode — they shift based on where the camera is. Use Camera Preview to see their actual play-mode positions and adjust placement accordingly.
Viewport Layout (HUD)
Pin UI elements to the screen — scores, energy bars, buttons, minimap — so they don't scroll with the world:
- Add a Viewport object from the Add menu
- Place objects inside the viewport zone
- Set the anchor point (top-left, top, center, bottom-right, etc.)
- During play, anchored objects stay fixed on screen regardless of camera movement
To spawn somewhere random within what the player can currently see, calculate the visible area from camera properties:
set left Camera.x - Camera.viewportWidth / 2
set top Camera.y - Camera.viewportHeight / 2
set spawnX left + random(0.1, 0.9, float) * Camera.viewportWidth
set spawnY top + random(0.1, 0.9, float) * Camera.viewportHeight
spawn "Food" {x: spawnX, y: spawnY}
Camera Preview
Use Camera Preview in the editor (View menu or the camera icon) to see exactly what the player will see without entering play mode. The preview shows the viewport frame, subject tracking, and parallax scrolling in real time. Drag the preview to simulate camera movement and check how your parallax layers behave. Essential for getting parallax rates and subject framing right before you hit play.
Manual Panning
Let players drag empty space to pan the camera around — useful for maps, strategy games, or exploration. Off by default, enable it in cell properties or script:
set Cell.canvasDraggable true
Script Control
Position and zoom the camera directly from script — cutscenes, reveal sequences, or custom camera behaviors:
set Camera.zoom 2                  // Zoom in 2x
set Camera.x 1.5                  // Pan to world position
set Camera.y 0.5
set Camera.zoom 1 over 1000       // Smooth zoom out over 1 second
| Property | Read | Write | What it does |
|---|---|---|---|
Camera.x / Camera.y |
Yes | Yes | Viewport center in world coordinates |
Camera.zoom |
Yes | Yes | Zoom level (1 = default, 2 = twice as close) |
Camera.viewportWidth / Height |
Yes | No | Visible area size in world units |
Camera.aspectRatio |
Yes | Yes | Viewport width/height ratio |
Camera.subjectTransition |
Yes | Yes | Pan duration in ms when switching subjects |
Cell.width / Cell.height |
Yes | No | Total cell size — compare with viewport to know if scrolling is needed |
Wheel zoom. Pair Camera.zoom with the onScroll event (§5) to let the player zoom with the mouse wheel or trackpad. Apply the scroll amount multiplicatively so each notch feels even, and clamp to a sane range:
onScroll:
  set Camera.zoom max(0.5, min(8, Camera.zoom * (1 - scrollY * 0.1)))
scrollY > 0 (scrolling down/toward you) zooms out here; flip the sign for the opposite feel. Put this on the cell script to catch the wheel anywhere.
Screen Shake
Shake the camera for feedback — collisions, explosions, dramatic moments:
screenshake 300                    // Quick 300ms shake
screenshake 500 5                  // Stronger intensity
screenshake 2000 1-5               // Ramp from gentle to intense
screenshake 500 loop               // Continuous until stopped
stop screenshake
16. Spawning
Not everything in your project exists from the start. Coins appear when a chest opens. Projectiles fly when a launcher fires. Tiles populate a board when the game begins. Robots arrive in waves. Spawning lets you create objects at runtime from templates you design in advance.
Templates
Any object can be a template — just enable Template in its properties. Templates are invisible during play and don't participate in physics. They're blueprints: you design how the object looks, give it scripts, set its properties, and then spawn creates live copies of it whenever you need them.
A template can be anything — a simple shape, a complex component with children and animations, an audio object, even another spawner.
Creating Objects
spawn "Coin"
spawn "Coin" {x: 0.5, y: 0.3}
spawn "Tile" {col: 3, row: 5, color: "red"}
The spawned clone inherits everything from the template — appearance, scripts, states, physics settings. Parameters you pass in {} become local variables available in the clone's onSpawn handler:
onSpawn:
  set self.snapToGrid "Board"
  set self.cellX col
  set self.fillColor color
This is how you customize each spawned instance — pass position, color, team, speed, or any data you need. The template is the same, but each spawn can be different.
Once spawned, the clone is a fully regular object in the world — it has physics, responds to events, collides, can be followed, and can be referenced by name or tag like any design-time object. There's no difference between a spawned object and one you placed in the editor, except that spawned objects don't come back after reset.
Tags and names make spawned objects useful beyond just appearing. Assign tags in onSpawn so you can address groups of spawned objects. Generate unique names to build relationships between them — for example, a chain of followers:
onSpawn:
  addTag self #segment
  set self.myIndex segmentCount
  set segmentCount segmentCount + 1
  if self.myIndex > 0:
    enable self follow ("Segment" + (self.myIndex - 1)) distance 0.05 rigid
Spawning from a type — no template needed. When the first word after spawn is a type rather than a template name, Purl builds a fresh object of that type on the spot:
spawn shape "Marker" {x: 0.5, y: 0.5, width: 0.04, fillColor: "red"}
spawn text "Score" {x: 0.1, y: 0.05, content: "0"}
spawn circle "Dot" {x: clickX, y: clickY, width: 0.02}
spawn polygon "Profile" {points: routePoints}
Types are shape, text, line, grid, audio, emitter, mask, peg, viewport, data, and component; for shapes you can use the sugar rect/rectangle, circle, ellipse, polygon, or path directly. Everything else works the same as a template spawn — the params in {} set properties (and reach onSpawn), the object is fully scriptable, and destroy removes it. This is the way to build data-driven visuals — an elevation profile, a generated HUD, a procedural shape — without first authoring a stub template in the editor. (spawn "Name" with a quoted name still clones a template, exactly as before.)
Markers
A Marker is an invisible primitive — just an x/y position with optional rotation. Use it anywhere you need a named position reference: a place to spawn things, an animation target, a "look here" anchor, a probe point you can read from script. Markers don't render and don't collide; they're pure positional data.
Add one from the Add menu, position and rotate it where you need, give it a name.
As a spawn target:
spawn "Projectile" at MuzzlePoint
spawn "Projectile" at MuzzlePoint {speed: 2}
The spawned object inherits the marker's position and rotation — a projectile spawned at a rotated muzzle flies in the right direction automatically.
As a position reference (read in any script):
set self.targetX MyMarker.x
set self.targetY MyMarker.y
move self to MyMarker.x MyMarker.y over 500
When a marker is a child of a moving or rotating component, its world position updates automatically as the parent moves. Useful for things like detecting when a tilted container's edge reaches some level, or pointing one object at another's anchor.
Inside components: Place a marker inside a component (e.g., at the tip of a launcher barrel) and spawned objects become children of that component — they move with the parent. This is how you build things that fire from moving objects.
Spawn with Velocity
Give spawned objects an initial push:
spawn "Projectile" {x: self.x, y: self.y, vx: 2, vy: -1}
spawn "Projectile" at MuzzlePoint {vx: 1}
Combine with markers for projectiles that fire in the direction the launcher is facing.
Removing Objects
destroy self                       // Remove this object
destroy Robot                      // Remove a named object
destroy #tokens with fade 300      // Remove all tagged objects with transition
onDestroy fires before the object is removed — use it for cleanup, scoring, or visual effects. You can destroy any object, not just spawned ones — design-time objects can be removed too. The difference: design-time objects reappear when the cell resets, spawned objects are gone permanently.
Safe Spawn Positions
Need to spawn at a random spot that isn't inside a wall? Use randomFree() (see Querying the World):
set pos randomFree(self, 0.5)
if pos != 0:
  spawn "Pickup" {x: pos.x, y: pos.y}
Spawn Waves
Combine repeat, wait, and spawn for timed waves:
repeat 10:
  spawn "Robot" {x: random(0.1, 0.9), y: 0}
  wait 2s
17. Emitters
Want fire flickering on a torch, rain falling across the screen, sparks flying from a grinder, or confetti bursting on a win? Emitters create lightweight particle effects without spawning full objects — hundreds of tiny particles that are born, move, change, and die automatically.
How Emitters Work
Add an Emitter from the Add menu. It's a source point that continuously (or on demand) produces particles. Each particle has a lifetime — it spawns, moves in a direction, changes size/opacity/color over time, and disappears. The emitter itself is invisible in play; only the particles show.
Two shapes control where particles come from:
- Circle — particles radiate outward from the center (fire, explosions, sparks)
- Rectangle — particles spawn along the top edge and fall inward (rain, snow, dust)
Getting Started: Presets
Don't start from scratch — pick a preset and tweak from there. 15 built-in presets: Fire, Smoke, Rain, Snow, Sparks, Bubbles, Stars, Dust, Explosion, Confetti, Heal, Trail, Splash, Fireflies, Smoke Trail. Select one in the emitter properties, then adjust individual settings.
Controlling Emitters
Continuous emission: Set emitterRate to particles per second. Set to 0 to stop.
One-shot bursts: Set emitterBurst to N — emits N particles instantly, then resets to 0. Perfect for explosions, confetti pops, impact effects:
set Sparks.emitterBurst 20 // Burst 20 particles right now
From script: Start and stop emitters by toggling the rate or using show/hide:
set Torch.emitterRate 15            // Start emitting
set Torch.emitterRate 0             // Stop
Key Properties
Each particle's appearance changes over its lifetime:
| Property | What it controls |
|---|---|
particleLifetime |
How long each particle lives (ms) |
particleSpeedMin / Max |
Speed range — particles pick a random speed at birth |
particleSpread |
Emission arc in degrees — how wide the spray is |
particleShape |
circle, square, or line |
particleSizeStart / End |
Shrink or grow over lifetime |
particleOpacityStart / End |
Fade in or out |
particleColorA / B |
Random color range at birth |
particleColorEnd |
Fade to this color over lifetime |
particleGravityX / Y |
Gravity on particles (rain falls, sparks arc) |
emitterGlow |
Additive halo glow (0–1) — makes particles look luminous |
Particles and Physics
Emitter particles live in their own physics — they don't interact with the cell's gravity, wind, or drag. You control particle behavior with the emitter's own particleGravityX/Y and particleDrag settings. If you want particles to match the cell's wind (smoke blowing with the world), you can sync the emitter's gravity to the cell's wind value from script.
Inside Components
Emitters inside components move with the parent — attach a fire emitter to a torch component and it follows. Particles themselves detach into world space once emitted, so they trail behind naturally when the parent moves.
18. Audio
Sound brings a project to life — background music sets mood, sound effects give feedback, spatial audio creates immersion. Audio objects live in the cell like any other object, but they produce sound instead of visuals.
Adding Sound
Add an Audio object from the Add menu. Choose a type:
- SFX — short sound effects (clicks, pops, impacts). Each play is independent — multiple can overlap.
- Music — background tracks. Only one plays at a time per audio object.
- Dialog — voice lines or narration.
- Ambient — environmental loops (wind, rain, crowd noise).
Upload an audio file or paste a URL in the properties panel. Uploaded files get embedded into the HTML export — convenient but increases file size. URLs keep the export small but the audio must remain accessible online for playback to work.
Playing and Controlling
Any script on any object can play any audio object by name — you don't need one audio per object. One "Click" SFX can be shared across every button in the project.
play SFX1                             // Play once
play Music loop                       // Loop continuously
play Music fadeIn 2000                // Fade in over 2 seconds
pause Music                           // Pause (resume with play)
pause Music fadeOut 1000              // Fade out over 1 second, then pause
stop Music                            // Stop and reset to beginning
stop Music fadeOut 2000               // Fade out over 2 seconds, then stop
set Music.volume 0.5                  // Half volume
Combine keywords in any order: play Music loop fadeIn 3000.
pause halts immediately and play resumes from the paused position. stop halts and rewinds — a follow-up play starts at the beginning. Both halt the audio even if it was started by autoplay or another script — they always win.
play, pause, and stop also accept a #tag and fan out to every audio object carrying it — useful for grouping music and pausing/resuming the whole group from a pause menu:
pause #music fadeOut 500              // Pause every audio tagged #music
play #music fadeIn 500                // Resume them together
stop #sfx                             // Stop every tagged sound effect
Fade Controls
Use fadeIn on play to ramp volume from silence to the target over a duration (in milliseconds). Use fadeOut on stop or pause to ramp to silence before stopping or pausing. This is essential for smooth music transitions — crossfade between tracks by fading out the old one while fading in the new one.
Sequencing Tracks
The onAudioEnd event fires when a non-looping audio object finishes playing. Use it to chain tracks:
// On the audio object itself:
onAudioEnd:
  play NextTrack
Looping audio never fires onAudioEnd — it loops indefinitely until stopped.
Key Properties
| Property | What it does |
|---|---|
autoplay |
Start playing automatically when the cell loads |
loop |
Loop when playback reaches the end |
extend |
Keep playing across cell transitions (for continuous music) |
buffered |
Each play is independent — multiple can overlap (default for SFX) |
volume |
Playback volume (0–1) |
spatial |
Volume decreases with distance from camera subject — objects far from the player sound quieter |
spatialRange |
Distance (0–1) where volume reaches zero |
startMarker |
Start playback from this position (seconds) |
duration |
Play only this many seconds from the start marker |
Shared vs Buffered
Non-buffered audio (the default for Music, Dialog, Ambient) uses a single shared player per unique source file. If two objects reference the same audio, only one instance plays — calling play from a second object joins the existing playback rather than starting a new one. This is what you want for background music.
Buffered audio (the default for SFX) creates an independent instance each time play is called. Multiple overlapping plays are possible — rapid gunfire, overlapping footsteps, button clicks that retrigger before the previous one finishes.
Music Across Cells
To keep music playing seamlessly across cell transitions, enable extend on the audio object. When the player navigates to another cell, extended audio keeps playing — non-extended audio stops.
If you want the same music available in multiple cells (so it plays regardless of which cell the player enters), place a copy of the audio object in each cell with autoplay, loop, and extend all enabled. When the player enters Cell 1, the music starts. When they move to Cell 2, the extended audio survives the transition. Cell 2's autoplay sees that the same source is already playing and joins it instead of restarting — so the music continues without interruption.
19. Masks
Masks let you hide parts of the scene and selectively reveal them. Fog of war, digging games, scratch cards, flashlight-in-the-dark, revealing a hidden picture piece by piece — all built with masks.
How Masks Work
Any shape can be a mask. Set the mask flag on the shape — that shape becomes the visible covering, and revealers punch holes through it. There's no separate Mask object; the covering and the clip region are the same shape.
- Draw the covering you want as a normal shape — a dark rectangle for fog, a brown polygon for dirt, an image of clouds, whatever
- Toggle the mask flag on it (Mask tab in the properties panel)
- Make another object a revealer (
revealer: true) — as it moves, it punches holes through any overlapping mask, exposing what's underneath
For fog of war: a dark rectangle covers the map and is flagged as a mask. The player has revealer: true. As they move, holes appear in the rectangle and the map shows through. For digging: a brown shape covers buried items, flagged as a mask. Click to reveal at specific spots.
A shape can be a mask or a revealer, not both — the two flags are mutually exclusive.
Revealers
An object with revealer: true automatically punches holes in overlapping masks as it moves. Configure revealer settings in the Rev tab.
By default a revealer affects every mask it overlaps. To target specific masks, tag the mask shape and set the revealer's revealTags to match — only masks carrying any of those tags get revealed by this revealer.
Invert Mode
Default behavior: the mask shape is the visible covering, the revealer carves through. Set the mask's invert property to flip this — the mask shape starts hidden, and the revealer paints it back in. Useful for cup-fill effects, gauges, progress shapes: a Liquid polygon with mask: true and invert: true, plus a Level revealer that climbs upward, paints the liquid into the cup as it rises.
Properties
The mask shape sets defaults that all revealers share when carving through it:
| On the mask | What it controls |
|---|---|
revealRadius |
Default radius for the revealed area (mask-relative units) |
revealFade |
Default soft-edge blur width |
revealNoise |
Default edge noise (0 = smooth, 1 = ragged/organic) |
invert |
Mask hidden by default; revealer paints it in |
A revealer can override those defaults per-instance — useful when a small flashlight and a big explosion both carve the same mask:
| On the revealer | What it controls |
|---|---|
revealerRadius |
Override the radius |
revealerFade |
Override the edge fade |
revealerNoise |
Override the edge noise |
revealerShape |
circle or rect reference shape |
revealerRehide |
Fog grows back behind the revealer when it moves away — flashlight effect |
revealTags |
Limit this revealer to masks carrying any of these tags |
Script Control
Reveal specific spots from script — useful for digging, click-to-reveal, or scripted cutscene reveals:
reveal Fog 0.5 0.5 0.1                // Reveal at position (x, y, radius)
reveal Fog self.x self.y 0.05 0.02    // Reveal around self with fade
rehide Fog                            // Reset to fully opaque
Fog here is the name of any shape with the mask flag set.
20. Levels & Ramps
Purl is 2D, but sometimes you need things to pass over or under each other — a bridge over a road, a tunnel under a hill, a multi-story building where characters walk on different floors. Levels add this vertical dimension without actual 3D. Objects at different levels simply ignore each other — they don't collide, don't detect overlap, don't show up in spatial queries. Two objects can occupy the exact same x/y position but on different levels and never interact.
Level Property
Every object has a Level dial in the Object tab. Default is 0 (ground). Higher values = elevated, lower = underground. Set a bridge deck to level 1 and ground traffic passes underneath without collision.
set Bridge.level 1
set Tunnel.level -1
ALL (level -999) is special — it collides with every level. Use for walls or pillars that span all elevations.
What Level Affects
Level filtering is uniform — every system follows the same rules:
- Collision and blocking: only between objects at the same level
- Sensors and overlap: only detect objects at the same level
nearby(),nearest(),intersects(): only return objects at the same level- Pathfinding: A* bitmap filtered by level
- Render order: higher level draws on top
- Visual scale: higher level appears larger (controlled by cell's Level Scale Step — e.g., 0.2 means each level is 20% larger)
Remember the visual vs collision footprint distinction (see Making Contact). The visual footprint determines rendering level — a character with a large hat and collision depth 1 (only the body collides) starts rendering at the higher level as soon as the hat enters the ramp, even though the body hasn't reached it yet. This is important: without it, the hat would render under the bridge while the body is still on the ground — visually breaking the illusion. The visual footprint enters early so the whole character draws correctly.
Ramps
Levels are static — an object is at level 0 or level 1. But how does it get from one to the other? That's what ramps do. A ramp is a transition zone — when an object walks through it, its level changes. This is how you build bridges you can walk up, tunnels you can enter, and multi-story buildings with stairs.
Add a Ramp from the Add menu (infrastructure section). It's a rectangle — invisible in play, shown with colored edges in build mode.
Properties:
- From Level and To Level: the two levels the ramp connects (e.g., 0 and 1)
- Edge types: each edge is
from,to, orpass— click the circular labels around the square in the properties panel to cycle
Edge types:
- From (green): represents the fromLevel side
- To (orange): represents the toLevel side
- Pass: no level interaction — objects cross freely
The principle: what matters is which edge you first touch entering the ramp and which edge you last touch leaving it. The combination determines the outcome:
| Enter through | Exit through | Result |
|---|---|---|
| From | To | Level changes to toLevel (went through) |
| To | From | Level changes to fromLevel (went through in reverse) |
| From | From | Level reverts (backed out) |
| To | To | Level reverts (backed out) |
| From/To | Pass | Level reverts (fell off the side) |
| Pass | Anything | No level change (passed through) |
Only From → To or To → From actually change the level. Everything else reverts. If an object enters through Pass, the ramp has no effect — the object was just passing by.
While inside the ramp:
- Object renders at toLevel (drawn on top of lower-level objects)
- Visual scale smoothly interpolates between fromLevel and toLevel
- While touching a From edge, collision works at both levels (so objects behind you at fromLevel can still interact)
Common Setups
Standard ramp (road going up to a bridge):
- Left = from, Right = to, Top/Bottom = pass
- From Level = 0, To Level = 1
Level zone (flat elevated area like a platform):
- All four edges = from
- Objects entering from any side transition up; exiting from any side transitions down
Bridge (full setup):
- Left ramp: Left=from, Right=to (goes 0→1)
- Bridge deck: a blocking object at level 1
- Right ramp: Left=to, Right=from (goes 1→0 from the other side)
Ramps need blockers
A ramp only changes level — it doesn't block movement. To make a ramp work properly, surround the pass edges with blockers so objects can only enter and exit through the intended from/to edges. Without blockers, objects can wander in from the side and pass through without transitioning.
For a bridge: place walls along the ramp's top and bottom edges (the pass sides) to guide traffic through the from and to edges. The bridge deck itself is a blocker at the elevated level.
Tips
- Set
Level Scale Stepin cell settings to control the visual size difference between levels (0.2 = 20% per level, 0 = no scaling) - Use ALL level for walls that should block at every elevation
- The ramp's
fromedge adds dual-level collision while the object straddles it — a tank behind you at ground level can still push you
21. Navigation
Your project is made of cells, and how you structure them is up to you. A simple game might be one cell with everything in it. A larger project might have a title screen cell, a settings cell, multiple level cells, and a game over cell. But cells aren't the only way to organize — a menu doesn't have to be a separate cell. You can show/hide a menu panel within the same cell, or transport objects in and out of the visible area. Use cells for distinct scenes (levels, rooms, screens) and in-cell show/hide for overlays (menus, dialogs, HUDs).
When you do navigate between cells, each transition can be instant or animated, and you control what gets reset along the way.
Start Cell
One cell is marked as the start cell — the entry point when the project plays. Set it in Map View by right-clicking a cell and choosing "Set as Start", or by dragging the start marker (the flag icon) to the desired cell. The restart command always returns to this cell.
When you press Play while editing a specific cell, play starts from that cell — not the start cell. This lets you test any cell directly without navigating to it every time.
Moving Between Cells
goto "LevelTwo"                        // Jump to another cell
goto "LevelTwo" with fade 500          // Fade transition over 500ms
goto "LevelTwo" with slide-left 300    // Slide in from the right
Transition types: fade, slide-up, slide-down, slide-left, slide-right, zoom. Duration accepts expressions: goto "Next" with fade random(200, 500).
What Happens on Arrival
By default, navigating to a cell preserves all variables and objects keep their previous play state (positions, properties changed by script). To control this:
goto "LevelTwo" clean                  // Reset objects to design-time, keep variables
goto "LevelTwo" fresh                  // Reset objects AND session variables
You can also trigger a transition animation on the destination cell's onEnter:
transition fade 500 // Animate the cell appearing
Restarting
restart                                // Go to start cell, full reset
restart cell                           // Restart current cell only
restart with fade 300                  // With transition
Example: Title → Play → Game Over → Retry
A typical project flow:
Title cell — player clicks "Play":
onClick:
  goto "Level1" with fade 500
Level1 cell — initialize on entry, track score:
onEnter:
  set score 0
  set lives 3
Player loses all lives — go to game over:
if lives <= 0:
  goto "GameOver" with fade 300
GameOver cell — show score, offer retry:
onEnter:
  set ScoreText.content "Score: " + score    // score survives the goto
Retry button — go back to Level1 with a clean slate:
onClick:
  goto "Level1" clean with fade 300          // clean: reset objects, keep score for display
Back to title — full reset:
onClick:
  restart with fade 300                      // restart: go to start cell, reset everything
The key: goto preserves variables by default (so GameOver can read the score). clean resets objects but keeps variables. fresh resets both. restart goes back to the start cell with a full reset.
Resetting Without Navigating
Sometimes you want to reset data without leaving the cell:
reset session                          // Clear session variables
reset game                             // Clear game-scoped variables too
reset all                              // Clear everything including local storage
reset objects                          // Reset objects to design-time, keep variables
reset fresh                            // Reset objects + session variables
reset visits                           // Reset current cell's visit counter
22. Saving & Loading
Everything the player does — collecting items, reaching checkpoints, changing settings — lives in memory and vanishes when they close the page. Saving captures the entire game at a moment in time and stores it in the browser (or on the device for Purl Player). Loading restores it — same cell, same positions, same variables, same spawned objects. Purl has two mechanisms: auto-save (happens transparently when the player leaves) and save slots (you control from script for checkpoints, multiple save files, etc.).
Auto-Save
Enable in project Settings. The game saves automatically when the player closes the tab, refreshes, or switches away. When they return, it restores exactly where they were — same cell, same positions, same variables.
The newGame Variable
When a save is restored, newGame is false. On a normal fresh start, it's true. Use this to guard initialization so you don't overwrite restored data:
onEnter:
  if newGame:
    set lives 3
    set score 0
Without this guard, returning to a saved game would reset the score to 0.
Fresh Start Cells
Title screens and menus shouldn't restore a save — the player expects to see the menu, not resume mid-game. Enable Fresh Start on these cells. A Fresh Start cell discards any existing save on restore and doesn't trigger auto-save itself.
Save Slots
For manual save/load (checkpoints, multiple save files):
save "checkpoint"                      // Save current state
load "checkpoint"                      // Restore from save
delete save "checkpoint"               // Delete a save

if hasSave("checkpoint"):              // Check if save exists
  show ContinueButton
What Gets Saved
Variables (all scopes), object properties, spawned objects, physics positions/velocities, active animations (looping state group animations resume on load), current cell, visited cells, grid cell data, camera position. Not saved: audio position, in-progress transports, async script continuations (wait chains, repeat loops — these restart via onEnter/onMessage).
Behavior Across Platforms
| Editor (Play mode) | Exported HTML (browser) | Purl Player (mobile) | |
|---|---|---|---|
| Auto-save | Saves to browser storage | Saves to browser storage | Saves to app storage |
| Restore | Restores on next Play | Restores on page reload | Restores on app reopen |
| Exit Play | Space returns to Build — no save | Close tab — auto-save triggers | Back button — auto-save triggers |
endGame |
Returns to Build mode | Stops the game (stays on page) | Returns to app library |
restart |
Full reset, starts from beginning | Full reset, starts from beginning | Full reset, starts from beginning |
23. Time Control
Time scale lets you slow down, speed up, or freeze the game — slow motion for dramatic moments, pause menus, per-object speed overrides.
set Cell.timeScale 0                   // Freeze everything
set Cell.timeScale 0.5                 // Half speed (slow-mo)
set Cell.timeScale 0 over 500          // Smooth fade to freeze
set self.timeScale 2                   // This object runs at double speed
Cell timeScale affects everything: physics, animations, audio playback, script waits, deltaTime in onTick. It does NOT affect input, collision detection, camera, or rendering — the game still looks and responds normally, it just runs slower or faster.
Per-object timeScale overrides the cell value. This is how you build a pause menu — freeze the cell but keep the menu and music running:
onKeyDown "Escape":
  if not paused:
    set paused true
    set Cell.timeScale 0               // Freeze the world
    set PauseMenu.timeScale 1          // Menu stays responsive
    set Music.timeScale 1              // Music keeps playing
    show PauseMenu
  else:
    set paused false
    set Cell.timeScale 1               // Resume
    hide PauseMenu
End Game
endGame
In the editor, returns to Build mode. In an exported HTML, stops the game. In the Purl Player app, returns to the library. Essential for mobile where there's no keyboard shortcut to exit.
24. Communications
Objects don't just interact through collisions and overlaps — they also need to talk to each other. A switch tells a door to open. A timer tells everything to freeze. A scoring system broadcasts the current score. Purl has two communication systems: internal messaging between objects within the project, and external HTTP for talking to the outside world.
Internal Messaging
shout broadcasts a message to all objects in the current cell. Any object (or the cell itself) with a matching onMessage handler responds:
shout "GAME_OVER"

onMessage "GAME_OVER":
  disable self movable
  set self.opacity 0.5
Every object that has onMessage "GAME_OVER" runs its handler independently. This is how you coordinate without objects knowing about each other — the switch doesn't need to know which door to open, it just shouts "OPEN" and any door listening reacts.
Passing data with messages:
shout "SCORED" {points: 10, who: self.name}

onMessage "SCORED":
  set score score + points
  log who + " scored " + points
Parameters arrive as local variables in the handler.
Targeted messages — send to a specific object or tag instead of broadcasting:
shout to Door1 "OPEN"
shout to #robots "FREEZE"
Cross-cell messaging — by default, shout only reaches the current cell. Add global to broadcast to all cells:
shout "LEVEL_COMPLETE" global
onMessageFrom — respond only to messages from a specific sender:
onMessageFrom "Switch1" "TOGGLE":
  if self.state == "OFF":
    set self.state "ON"
  else:
    set self.state "OFF"
Shout vs Variables
You can coordinate objects two ways: set a shared variable and have objects check it, or shout a message and have objects react. The difference matters:
Variables are state — they persist. Any object can read them at any time. Use when you need to remember something: set gameOver true, then any object can check if gameOver: whenever it wants. The information is always available.
Shout is an event — it fires once and is gone. Objects must be listening at that exact moment or they miss it. Use when something just happened and others need to react right now: shout "DOOR_OPENED". It's fire-and-forget.
| Variable | Shout | |
|---|---|---|
| When to use | Ongoing state that anything might check later | Something just happened, react now |
| Example | set gameOver true |
shout "GAME_OVER" |
| Persistence | Stays until changed | Gone after handlers run |
| Timing | Read anytime | Must be listening when it fires |
| Coupling | Objects read a shared name | Objects don't know who shouted |
In practice, you often use both: shout an event AND set a variable. The shout triggers immediate reactions (play a sound, show an animation), the variable lets objects that spawn later or check on their own schedule know about it.
External: Open URL
Your project can reach outside itself — open web pages, link to other content:
openUrl "https://example.com"
openUrl "https://example.com" newTab
openUrl "https://mysite.com/user/" + playerId newTab
By default replaces the current window. newTab opens in a new tab. The URL can be a string, variable, or expression. Browser popup blockers may prevent new tabs unless triggered by a direct user action (onClick, onKeyDown).
External: HTTP Requests
Talk to servers — submit scores, fetch leaderboards, load dynamic content:
post "https://api.example.com/scores" {name: playerName, score: finalScore}
fetch "https://api.example.com/leaderboard" into scores
post sends JSON via HTTP POST. fetch retrieves JSON via HTTP GET into a variable. Both set httpError on failure. The receiving server must have CORS headers allowing requests from your export's domain.
Timing
Both statements wait for the server before the next line runs. After fetch ... into scores, you can read scores immediately.
Reading the result
The fetched value is the parsed JSON. If the server returns an array of objects, iterate it like any list:
fetch "https://api.example.com/leaderboard" into scores
foreach entry in scores:
  log entry.name " — " entry.score
If the response is a single object, access fields with dot notation. Mixed indexing and property access works:
set Slot1.content scores[0].name + ": " + scores[0].score
Error handling
Both statements clear httpError on success and set it to a non-empty string on failure (HTTP non-2xx, network error, or non-JSON response). Check it after every call:
post "https://api.example.com/scores" {name: playerName, score: finalScore}
if httpError != "":
  set ErrorMessage.content "Couldn't submit: " + httpError
  show ErrorMessage
httpError is either a status string (e.g. "HTTP 401: Unauthorized") or "Network error". On a fetch failure the destination variable is set to null.
End-to-end leaderboard
action submitAndRefresh:
  post "https://api.example.com/scores" {name: playerName, score: finalScore}
  if httpError != "":
    show SubmitError
    return
  fetch "https://api.example.com/leaderboard" into scores
  if httpError != "":
    show LeaderboardError
    return
  // scores is an array of {name, score} — render top 5
  set Slot1.content scores[0].name + ": " + scores[0].score
  set Slot2.content scores[1].name + ": " + scores[1].score
  set Slot3.content scores[2].name + ": " + scores[2].score
  set Slot4.content scores[3].name + ": " + scores[3].score
  set Slot5.content scores[4].name + ": " + scores[4].score
Server contract
post sends Content-Type: application/json with the data object JSON-stringified as the request body. fetch sends a plain GET with no extra headers. Success is any 2xx response; anything else — including a successful response whose body isn't valid JSON — sets httpError.
Limitations
The DSL currently supports only POST (JSON body) and GET (JSON response). Not supported: custom headers (auth tokens, API keys), other HTTP methods (PUT, DELETE, PATCH), non-JSON request/response formats, query-param objects, per-request timeouts, and credentialed cross-origin cookies. Build the URL string yourself if you need query params, and design your backend around simple POST/GET endpoints with anonymous reads.
Part 4: Reference
25. Examples
Open any example directly in the editor to explore how it's built, or play it first to see it in action.
RubiCubika — Open · Play
Rubik's-style color puzzle — demonstrates grid cell data, spawning with foreach, and state-driven visuals. One tile template with four color states gets spawned 36 times into a 6×6 grid. Clicking a tile rotates its 8 neighbors by reading and rewriting grid cell data, then syncs all visuals with foreach t in #tile. The board shuffles itself on enter with 30 random rotations you can watch unfold. A custom action checks win by verifying each quadrant has matching colors.
Connect Four — Open · Play
Connect 4 with AI — demonstrates minimax, grid cell data, and custom actions. Invisible click areas over each column trigger a dropPiece action that scans bottom-up for the first empty row, writes to grid data, and spawns a piece. The AI uses the built-in minimax function in drop mode with depth 5 — a single function call that returns the best column. Win detection is a custom action checking four directions from the last drop. A toggle switches between 1P and 2P.
Eighty — Open · Play
Number-tile puzzle — demonstrates draggable with validation, floodfill, aggregate queries, and game-scoped variables. Eighty draggable tiles on a 9×9 grid, each with limited moves. The interesting part is drag validation: onDragStart uses floodfill to detect bridge tiles (removing them would split the island), and highlights valid cells by checking adjacency. onDragEnd verifies connectivity again before accepting the drop. Win uses all #tile.state == "CORRECT". Difficulty settings use game.-scoped variables so they survive restart cell — a key pattern for settings that outlive cell resets.
Push The Crate — Open · Play
Sokoban-style grid puzzle — demonstrates that a complete game can be built with zero scripting. The entire gameplay — movement, collision, pushing, pulling — comes from properties set in the UI. The player is movable + blocking + keyboard snapped to a grid. Crates are movable + blocking on the same grid. Walls are blocking only (no movable, so they can't be pushed). Push a crate by walking into it — momentum transfer slides it one cell. Hold Shift to pull — walk away from a crate and it follows. A sensor on the goal detects when cargo arrives. Everything is set in the properties panel — the same properties could also be set via script, or mixed: set physics in the panel, add controls via script at runtime. UI and script are fully interchangeable — they set the same properties, just at different times. The only script in the project is a restart button.
SnakeSim — Open · Play
Snake game — demonstrates follow rigid chains, dynamic spawning, trail rendering, and script input. The head uses forward-axis steering with press "ArrowUp" on every tick for constant forward motion. Eating food spawns a Segment that follows the head with follow rigid — each new segment unchains the previous one and relinks it to the new one, building a dynamic follow chain. Existing segments shrink on each "SHRINK" message to create a tapering body. The head component has a trail with tapered width for the base body shape, a tongue with state tweens that flicks randomly, and a ghost sensor child for food detection. Food spawns at random viewport positions using Camera properties to stay on screen. A countdown Starter delays the game start by toggling a variable that gates the script input.
TankSim — Open · Play
Top-down tank combat on a large 8×8 cell — the most complex example, covering component architecture, AI control via script input, resource management, spawned projectiles, and damage states.
Tank structure: Each tank is a deeply nested component — body, two track assemblies (each with front/core sub-components), an independently rotating turret (tower, barrel, tip), lights, trail marks, shadow, and a smoke emitter. Each track assembly has state groups (ROLL-L, ROLL-R) that animate the tread segments. Movement uses forward-axis steering with steerRate for tank-like turning. The key animation pattern: onMove "forward" plays both track groups with reverse, onMove "backward" plays them without — so treads visually reverse direction. Rotation plays tracks in opposite directions (onRotate "cw" plays ROLL-L forward and ROLL-R reversed) to simulate differential steering. All animations use resume to avoid restarting mid-cycle. Shooting triggers separate SHOOT and RECOIL animation groups for barrel kickback.
Turret control: The turret rotates independently from the hull via onTick — set self.Turret.rotation modified by deltaTime while Q/E keys are held. This is child property access from the parent component's script.
Shooting: Spawns a projectile template at the turret tip position with velocity computed from the turret angle using cos/sin. Includes reload timing, ammo tracking, recoil animation, and screenshake. On spawn, the projectile transfers camera subject from the tank to itself (disable "Tank" subject / enable self subject) so the camera follows the shell in flight. On impact it spawns explosion and debris emitters, then transfers subject back to the tank — creating a brief cinematic follow effect for every shot.
Human to AI — one pattern: The player tank is built with keyboard controls (Q/E for turret, Space to fire, arrows to move). AI tanks are the same tank with one addition: a large invisible sensor child that acts as a detection zone. When a target enters the sensor, its onTick computes bearing using atan2, calculates angular difference to the turret, and sends script key presses (press "q"/"e"/"Space" on parent). The tank's own scripts handle these keys identically to physical input — no separate AI movement code exists. The same scripts that respond to the player's keyboard respond to the sensor's script presses. The ally tank adds follow to trail the player while using the same sensor system to aim at enemies.
AI patrol: Enemy tanks moveTo random waypoints using pick(["WP1","WP2","WP3","WP4"]). On onStop they pick a new waypoint, creating continuous patrol with pathfinding around obstacles.
Resource management: The player tank tracks fuel, ammo, and armor as custom object properties. Fuel decreases per-frame in onTick while moving (self.consumingFuel flag). Empty fuel disables movement. HUD counters listen for "UPDATE" messages and read properties cross-object (Tank.ammoCount, Tank.fuelLevel). Counters use states (OK/CRITICAL) for color changes at low levels.
Damage and destruction: Collision with tagged missiles reduces armor. Progressive damage states (DAM1, DAM2) change the tank's visual appearance and increase smoke emitter rate. At zero armor: movement disabled, tagged #dead, sensor destroyed — stopping the AI entirely.
Pickups: Crate and barrel components scattered across the map are sensors that shout "AMMO", "FUEL", or "ARMOR" with random quantities on player overlap, then destroy themselves.
Pause menu: Escape or M toggles an in-game menu built entirely within the cell — no separate cell needed. The menu script sets Cell.timeScale 0 to freeze the entire game while keeping the menu and music running with Menu.timeScale 1 and Theme.timeScale 1 (per-object timeScale overrides the cell freeze). Menu buttons use onHover/onHoverEnd with states for highlight effects. Save/Load use save "checkpoint" and load "checkpoint" for mid-game persistence. New Game deletes the save and restarts. Shows how to build a full game menu as a show/hide overlay without leaving the cell.
Sandbox cell: A separate 3×3 cell demonstrating levels and ramps. A bridge component contains ramp objects that transition between level 0 (ground) and level 1 (bridge deck). Blocking walls at level 1 line the bridge edges — ground-level tanks pass underneath without collision, while tanks on the bridge are contained by the walls. Tanks patrol between waypoints using moveTo with onArrive to pick the next destination. One ally follows a path binding. Shows how levels add vertical separation without actual 3D — objects at different levels occupy the same x/y space but ignore each other for collision, overlap, and pathfinding.
TrainSim — Open · Play
A train on a closed loop — demonstrates path binding, script input, and message-driven control. Eight vehicles are all bound to one bezier path with forward-axis steering. A toggle drives the train by sending press "ArrowDown" every tick via onTick — the key concept being that script input (input: script) lets objects move without physical keyboard, controlled entirely by logic. A traffic light randomly turns red and an invisible sensor on the track shouts "STOP" when the train passes — the toggle listens and halts. Green resumes with "GO". Shows how unrelated objects coordinate through messages without direct references to each other.
GolfSim — Open · Play
Mini-golf in a cave — demonstrates drag-to-aim impulse, restitution tuning, trail rendering, and zero-script terrain. The ball is draggable with a slingshot mechanic: onDragStart records the click position, onDrag draws a visible aim line (PullLine), and onDragEnd computes the direction vector and fires impulse self (dx * 10) (dy * 10) — pull back and release like a slingshot. The ball has a trail with fading opacity for visual flight paths. The entire course is built from polygon shapes with blocking and tuned restitution — cave walls bounce the ball at 0.74, slopes at 0.6–0.7 — no scripts on any terrain piece. Gravity does the work: the ball arcs through the air, bounces off walls, rolls along slopes, and settles in valleys. The camera follows the ball as subject. A flag component at the hole animates with a looping pingpong FLAP state group. The tee is destroyed on first shot so it doesn't interfere with subsequent bounces.
PaddleSaga — Open · Play
Pinball-style ball game — demonstrates impulse, restitution, spinning blockers, and spawning collectables. A ball with restitution: 1 bounces perfectly off walls. Press any key to launch with a random impulse. The obstacles are simple blocking shapes with spin loop and glow loop — a spinning blocker is just a blocking shape with a built-in animation, no scripting needed for the rotation, and collisions work correctly against the spinning geometry. Each collision shouts "SCORE" and triggers a pulse visual effect. A death zone at the bottom costs a life and resets objects. Extra lives spawn randomly using count #life == 0 to ensure only one exists at a time. The paddle uses axis-x constraint with keyboard/gamepad input.
DigOut — Open · Play
Dig-and-explore game — demonstrates masks and revealers, rehide, spawning with intersects, and camera subject transfer. The world is hidden under a mask. The digger is a revealer with rehide — fog clears as it moves and slowly returns behind it. Dynamite is the highlight: touching one starts a timed sequence — it becomes a revealer itself, spawns a radius indicator that transitions from white to red, then checks intersects with the player for distance-based damage. A key pickup briefly transfers subject to the door so the camera pans to show where it opened, then returns to the digger. Uses count #treasure for dynamic totals and faceMovement for auto-rotation.
26. Recipes
Short, self-contained patterns you can copy and adapt.
Moving Platform
A blocking object that moves back and forth. Players ride on top.
// On the platform (movable, blocking)
onEnter:
  enable self movable speed 0.2
  set self.blocking true
  repeat:
    moveTo self 0.2 0.5
    wait movement self
    moveTo self 0.8 0.5
    wait movement self
Collectible Pickup
A sensor that disappears when the player touches it:
// On the collectible (sensor)
onOverlap:
  if other is #player:
    set score score + 1
    destroy self with scale 200
Door & Key
A conditional blocker that opens when the player has a key:
// On the door
set self.blocking "not hasKey"

// On the key (sensor)
onOverlap:
  if other is #player:
    set hasKey true
    destroy self
Countdown Timer
A text object that counts down:
onEnter:
  set self.content "30"
  set timeLeft 30

onTick:
  set timeLeft timeLeft - deltaTime
  set self.content floor(timeLeft)
  if timeLeft <= 0:
    goto "GameOver"
Trampoline
A bouncy surface:
// On the trampoline
set self.blocking true
set self.restitution 1.2
Restitution > 1 means the object bounces higher than it fell.
Patrol Robot
A robot that walks between waypoints:
onEnter:
  enable self movable speed 0.2
  repeat:
    moveTo self WP1.x WP1.y
    wait movement self
    wait 1000
    moveTo self WP2.x WP2.y
    wait movement self
    wait 1000
Toggle Switch
Click to alternate between two states:
onClick:
  if not self.isOn:
    set self.isOn true
    set self.state "ON"
    shout "SWITCH_ON"
  else:
    set self.isOn false
    set self.state "OFF"
    shout "SWITCH_OFF"
Energy Bar
A shape whose width tracks an energy value:
// On the energy bar background
onEnter:
  set self.maxWidth self.width

// Listen for impact
onMessage "IMPACT":
  set Player.energy Player.energy - impact
  set EnergyBar.width self.maxWidth * Player.energy / 100
Explosion on Impact
A projectile that spawns particles on collision:
// On the projectile template
onCollide:
  spawn "Explosion" {x: self.x, y: self.y}
  destroy self
// On the explosion emitter template
onSpawn:
  set self.emitterBurst 200
  wait 500
  destroy self
Score Counter
A text object showing a score:
// On the score text
onEnter:
  set self.content "0"

onMessage "SCORE":
  set score score + points
  set self.content score
Other objects: shout "SCORE" {points: 10}